The following article was first published in the Summer 2006 issue of Printmaking Today. INDRANI NAYAR-GALL reports on her development of a new system using ImagOn, which enables easy and accurate registration for four color printing processes.
note: other dry photopolymer films may be also used
Using color in printmaking has always been a challenge. Prints are, generally speaking, images transferred to paper (or other surfaces) from a freshly inked block or plate. The indirect nature of this process makes color printing a fairly complex affair requiring careful planning.
Technological advances and innovative thinking have seen better and faster registration methods for color printing replace older methods across various processes, particularly in plate lithography and screenprinting. The invention of metal buttons or registration pins [1] has made more accurate color registration – in stone lithography, especially, much easier to achieve than before. However, artists practising relief and intaglio processes continued to use older, more time consuming techniques. Although this has not stop anyone from producing excellent color works, their production can be tedious. Of the many methods, multi-plate color intaglio may be the most complex. On the one hand, the thickness and hardness of the metal plate prevented the use of registration buttons and, on the other, the expansion and contraction of dampened paper hindered accurate registration.

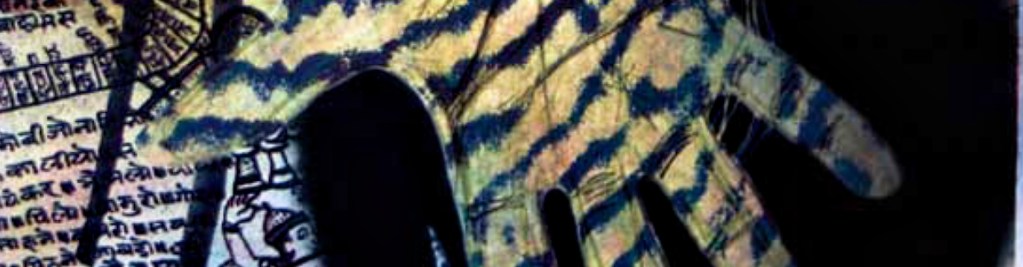
Indrani Nayar-Gall | Eclipse II | color IntaglioType print
There are currently four methods for multi-plate color registration used in intaglio [2]:-
1. mount board or mat registration
2. transferring the key-plate image
3. trapped paper registration
4. template registration
Mat, trapped paper and template methods rely on the plates being of identical size, and all being in exactly the same position each time a print is pulled for the colors to register correctly. In addition, accuracy of mat registration demands the plates to fit perfectly in the window of the mount board. Also, in the key-plate transfer process, precision in registration hinges again, precariously, on the accuracy of the plates’ size and window size. It’s easy to see how laborious these methods can be.
By contrast, research into nontoxic intaglio and the introduction of photopolymer films have given printmakers the opportunity to think in a totally new way. Among these new techniques, Keith Howard’s ImagOn process is perhaps the most advanced and fastest growing. Around 2001 Howard experimented with laminating ImagOn onto PETG (also known as glycolized polyester) and other polycarbonates, and although, within a short space of time, various research associates and especially David Jay Reed developed excellent four color methods, the process of printing remained essentially the same.
In 2004, two graduate students of RIT (Rochester Institute of Technology, NY) Adam Werth and Justin Myer Staller started experimenting with ways to simplify traditional registration methods. By replacing copper plates with a clear sheet of thin (0.020 – 0.030 gauge) PETG, they used its transparency in a totally new way to register plates in the four color process. Instead of positioning each plate on the press bed then placing paper on top (in the traditional way), after the first plate was printed in the usual manner, for the second and subsequent printings they used the plates transparency to enable them to accurately lay down the plate on top of the paper. This new thinking moved the ImagOn process forward by eliminating various problems; and the lightweight nature of the plates proved an added advantage when maneuvering large works.
Looking for Answers
This innovation was perfect for my own four-color projects. My first piece was very small and I experienced only minor problems. As the pieces got bigger and more complex, with considerable amounts of text and fine lines, registration became more difficult. One big problem I faced was the shifting of the plates. Thinner plates minimize the problem to agreat extent, but do not fully resolve it. By using thinner plates and reduced pressure, Werth achieved very good accuracy while Staller, using thicker ones, was faced with a bigger challenge. Although both achieved a reasonable degree of success, problems associated with the process make it somewhat unpredictable and tedious.
Faced with these issues, I went back to the drawing board and began re-examining the whole process. I felt strongly that of all the possible variables, two had to remain constant: the use of PETG or polycarbonate plates, and the traditional printing arrangement of having the plate remain beneath the paper to stop it from shifting during printing.
Once again, I turned my attention to the metal buttons or pins used in the registering of color screenprints and plate lithographs as a method guaranteed to produce precise results. The accuracy of the process simply depends on one’s ability to register all four transparencies together and then make holes using a standard hole-punch. It is much easier to register four transparencies once than to register each plate afresh every time one has to print a color. My challenge was to find a way to use this method for four color Intaglio Type. The solution was quickly found: the use of thin PETG in place of copper plates made it possible to punch registration holes with a hole-punch, and once that was done the rest was simple.
(Takach sell a three hole registration system that suits this method).
Step-by-Step Registration
METHOD
Register and print as follows:
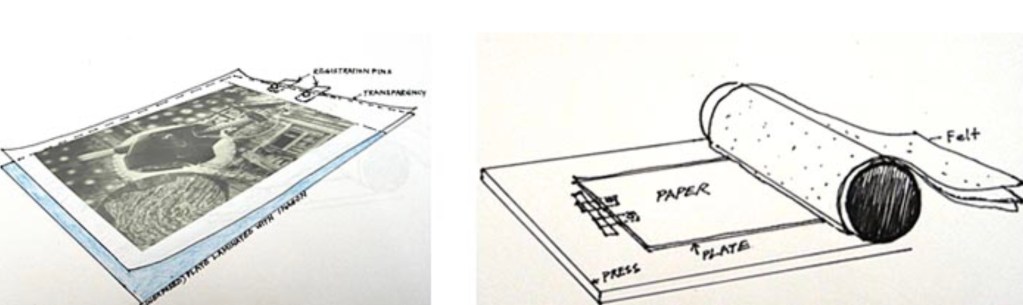
1. Prepare a color image in Adobe Photoshop with a minimum of 100-150mm (4 to 6 inches) space above the image. The other three sides should have a border at least 24mm (1 inch) wide.
2. Create registration marks on the four corners of the four-color digital halftone file before splitting the channels.
3. Print each transparency in black ink. For detailed instructions on preparing an image file for Intaglio Types, see: ‘Process Color Intaglio Type’ by David Jay-Reed in Keith Howard’s The Contemporary Printmaker [3]. However, this new registration method does not require the image files to be manipulated with blur or noise tools while being prepared in Photoshop.
4. Register all transparencies by laying them over one another and – using the registration marks as guides – clip or stick them together using large paper clips, small pieces of double-sided tape etc., to stop them shifting. This is the most crucial step; great care should be taken to ensure all transparencies are perfectly registered with one another.
Center the clipped pieces properly in a hole-punch and punch two holes at the middle of the top edge for registration.
5. A few sheets of intaglio printing paper, the same size as the plate, should be calendered and dried flat the previous day. For added support, attach clear tape to the edge of the paper that will be used for registration or use hole strengtheners on both sides. Then punch registration holes on all sheets of paper in a manner similar to that of the transparencies.
6. Cut four 3000 to 2000 gauge PETG or Styrene plates to the size of the transparencies. Center them properly and punch two holes at the top center of each plate in the same way as on the transparencies.
7. Laminate a piece of ImagOn (large enough for the image) on each plate.
8. Using registration pins, register each transparency to a laminated plate and expose in an exposure unit.
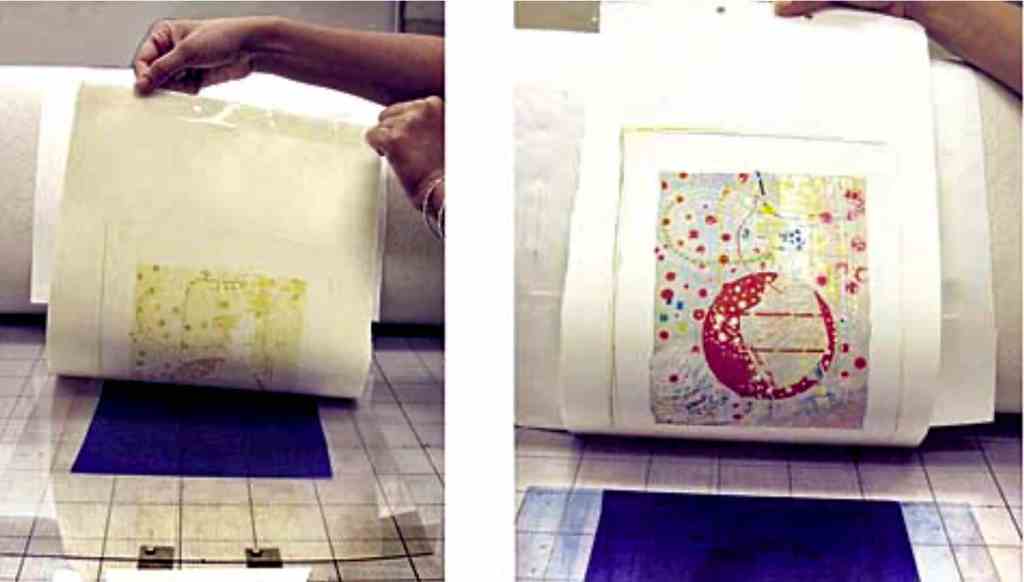
9. Develop all four plates and ink them using nontoxic Akua intaglio ink.
10. Dampen the printing papers that are already punched with registration holes and dry between blotters. The paper may buckle slightly underneath the tape, but this should not create any problems so long as a gap of 100-150mm (4 to 6 inches) is maintained between the image and registration holes. Register the paper first with the yellow plate by fixing the registration pins outside to prevent blanket damage.
A space of 150mm (6 inches) between registration pins and image will give the roller sufficient room to print the image. Print the yellow plate; fix the registration pins onto the bed with masking tape.
11. Print the rest of the plates by replacing the first printed plate with each subsequent color plate. Each time, the paper must be removed from each printed plate and should be attached into the registration pins of the next plate. Assuming the instruction in step 4 have been followed properly, all colors will register perfectly and printing will be easy.
12. Print an edition or series of variations.

The process is not limited to digital half-tone Intaglio Types. Any hand-prepared transparencies can be used, provided one follows the correct procedures for each technique.
By reducing the uncertainties of previous methods, this system enables printmakers to enjoy the printing process and its image-making potential. It should also save valuable time and energy. In The Contemporary Printmaker [3] Keith Howard writes:
“The evolution of contemporary (nontoxic) intaglio printmaking started in 1991 with my first book… It became the catalyst for artists from all over the world to re-think and re-invent printmaking in an unconventional, innovative, and safer manner.”
I am happy to be part of this research and particularly pleased to have solved a problem that plagued me for years and put me off four color intaglio. Using ImagOn with this registration system has made printing four color intaglio not only viable but also enjoyable.
Notes
1. See LITHCOPRODUCTS for images of these registration pins
2. The Complete Printmaker, The Free Press, Ed., Roundtable Press, revised & expanded 1990
3. The Contemporary Printmaker, Keith Howard, New York: Write-Cross Press, 2003
Indrani Nayar-Gall is an Indian-born interdisciplinary artist-activist. She lives and works in Charlotte, NC, USA.
Artist Homepage