
cmyk Printing Made Easy
by Roni Henning
CMYK refers to the traditional four separations that Litho and Screen Printers use with process color inks. Cyan, Magenta, Yellow and Black. These colors have been formulated to work together to create a complete color picture. The separations are made on the computer using Photoshop to break down each color into halftone dots, which are printable through the mesh of the screen. The size of the dots and how close or far away they are from each other creates the illusion of continuous tone.
Printing a screenprint using CMYK separations and process color inks will never give you the finest resolution that a digital print will. The mesh of the screen cannot print dots that are too tiny or to close together. However, what the screenprint loses in very fine resolution it makes up in an interesting textural surface. I often encourage my students to combine CMYK with hand separations, posterizations and dithers to layer colors and create an even richer surface. All screenprinters have their own methods when working with CMYK; this is mine.
Making the CMYK Film Separations
1)Choose an image that has a nice range of colors and print it out to have a color
reference.
- Open it up in Photoshop. These films were made with PhotoshopCS and an inkjet 3- 4- 5- 6- 7- printer.
- Go to image, scroll down to image size and change it to the size you want to print. Go back to image mode and scroll down and click on CMYK. The four separations should open up on the right. If they don’t go to windows and scroll down to channels and click on that. They will open.
- Once you have the separations you need to turn each one into a halftone. You do that in bitmap. The separations should be in grayscale already.
- Click on a separation.
- Go to image mode: bitmap. A box will open up. Resolution.
- Make the output higher than the input. If the images that you want to print are large there should be less difference between the input and the output. Click ok. A new box will open.
- Halftone Screen. It will have Frequency, Angle, and Shape. I set the frequency at 40 for beginning screenprinters. That makes the dots easier to print. If you want a finer resolution make the frequency higher. Then put in a separate angle for each color.
- These are the angles I use: C 22.5 | M 82.5 | Y 7.5 | K 52.5
- note: printers call black ‘K’ or key color
- Each separation has to be bitmapped with the appropriate angle.
- Make the shape round. THE SEPARATIONS WILL APPEAR
- DIFFERENT ON THE COMPUTER THAN WHEN PRINTED ON
- FILM. Print on paper first to see if it looks like a precise dot pattern (see picture above).

my screen angles:
C 22.5 | M 82.5 | Y 7.5 | K 52.5
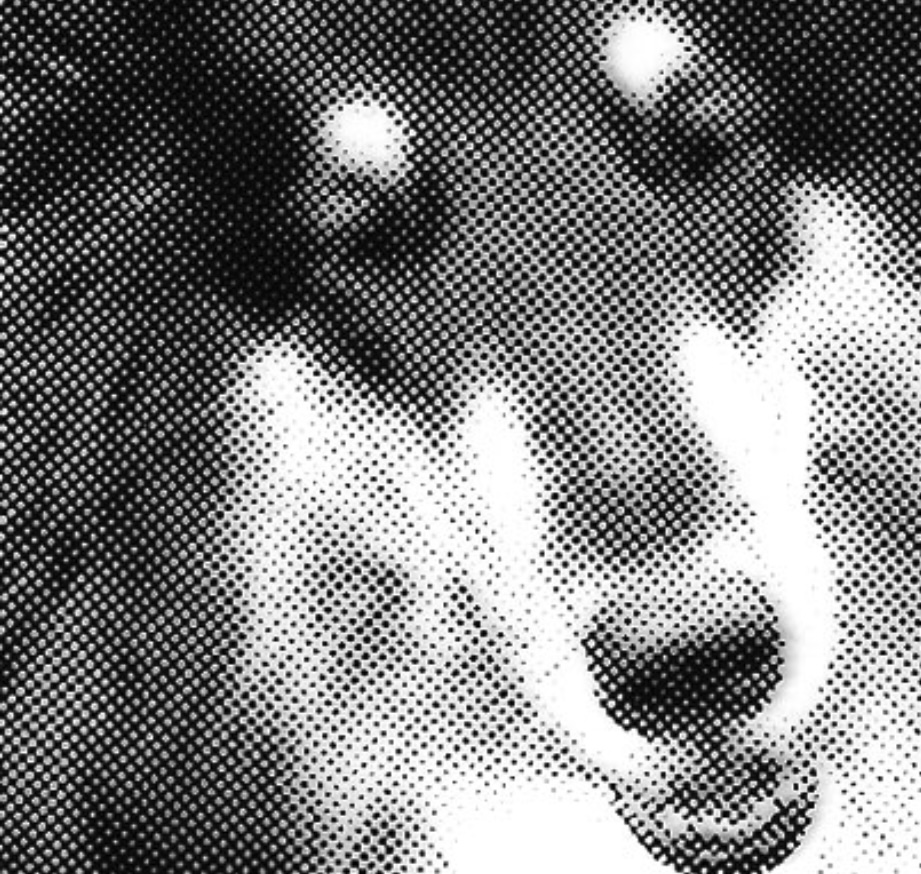
a halftone: levels of gray and color are translated into grid-like dot patterns of varying sizes, each color layer has a different structure and angle of dots

screened cmyk transparencies. (top) cyan and magenta, (below) yellow then black

progressive cmyk proofs: black | black and cyan | black and cyan and magenta
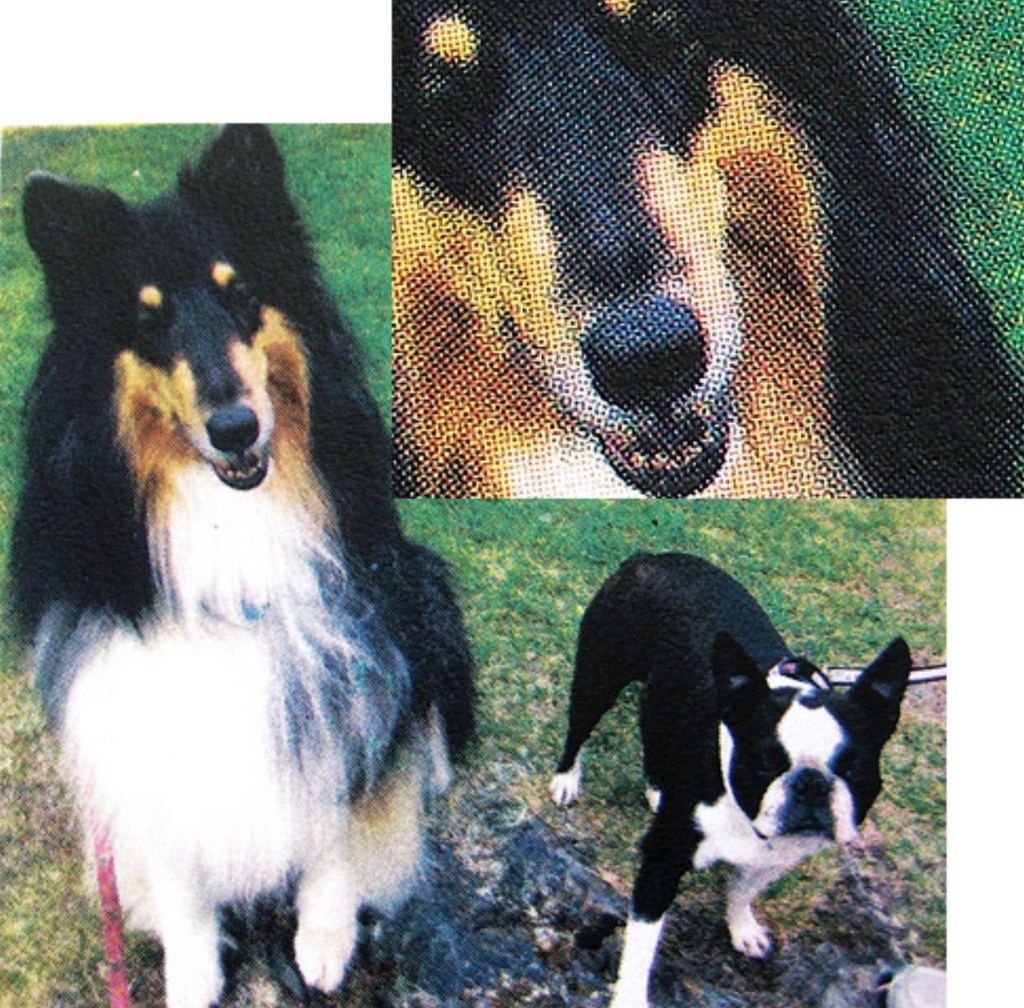
the finished four color screenprint and a close-up. The overlapping dot patterns that create the full color effect are clearly visible.
Dithers
You can also make CMYK films with a random dot pattern. Click on a separation go to Image than the input. Click OK. New box opens. Halftone. Change it to Dither. You need to put in any angles. The random dots appear like a mezzotint pattern or a litho crayon drawing. The finished print has more of a grainy quality than the halftone print.
Preparing The Screens
Choose a screen that has the right mesh (fine, medium, or coarse) for what you are planning to print. Remember a very fine dot pattern requires a finer mesh. These films were burned onto 195 polyester monofilament. Film separations are exposed (burned) onto screens coated with photo emulsion. The emulsion should specify use with water- based inks. I like the Ulano emulsions 925, TZ, and LX660. YOU MUST WORK WITH THE EMULSION UNDER A YELLOW SAFE LIGHT.
The emulsion is applied to the flat side of the screen with a metal scoop coater. I only use one even coat. Start from the bottom of a screen that is leaning against a wall wedged against something so it doen’t move when coating. pictures in my book WATER-BASED SCREENPRINTING TODAY. Pour the emulsion into the scoop coater and while holding it firmly against the screen tip it towards the mesh, so the emulsion is touching, and pull it up to the top of the screen in one fluid motion. Be careful not to let any of the emulsion drip back onto the coated screen when you pull it away after coating. I dry it with a floor fan. The LX660 takes about 20-30 minutes and it is ready to use.
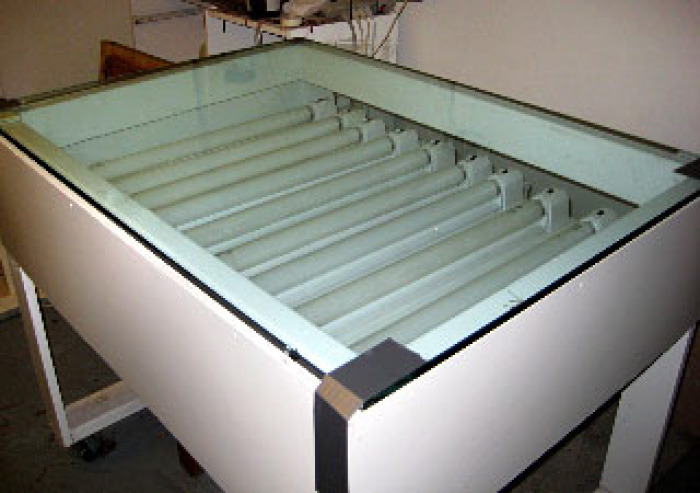
Simple Homemade Exposure Unit
Decide what size you want the exposure unit to be. That depends on the size of the screens you have. There is also a picture of a homemade unit in my book.
Start by building a box frame. You can use 2×3’s or 2×4’s for the framing wood depending on how big or strong you want it to be. Make a shelf with plywood 6-8 inches from the top. Cover the top with a heavy piece of glass. Place 8-10 florescent light fixtures on the shelf, evenly spaced. Replace the lights with ultraviolet lights. a strip-light UV exposure unit, note that this type is ideal for silkscreen but unsuitable for photo-polymer work. Today, smaller exposure units are often constructed using LED UV bulbs.
The Exposure
Tape your 1st film separation face down onto the flat side of the coated screen after it has dried. It should look the correct way from the inside of the screen (printing side). The screen has to be exposed to a light source to burn the image onto the screen. The light hardens the emulsion that is not covered with the black dot patterns of the cmyk films. It remains soft there and is then washed out with water to reveal the image.
You can use any light source to expose a screen. You just have to adjust your exposure time. For example 9 ultraviolet 20 watt tube lights will expose a screen in 2 minutes. A 5000 watt Halide light takes only 10-15 seconds and Photoflood lights about 15 minutes.
The best thing to do is to make some test exposures. If your exposure time is too short the emulsion will wash off. If the exposure is too long some of the image will not wash open and you’ll lose detail.
Lay the emulsion coated screen (with the film separation taped to it) onto the glass top facing the lights flat side down. Make a board cut to the inside dimension of the screen and cover it with a soft fuzzy material (like an old sweater). Place that board inside the screen. Then lay heavy weights on it to create a tight contact between the film separation and the coated screen.
You can use anything for weights. Bricks, cinder blocks, gallons of paint etc. It is important that the contact is very tight. The fuzzy board distributes the pressure evenly under the weights. Turn on the lights and time your exposure. You are ready to wash it out. Remove the separation from the screen.
Wash Out
It helps if you have a sink with a hose attached to your faucet with a spray nozzle on the end. But I have even washed out screens with just a spray water bottle. Spray the screen on the flat side until the image starts to appear. The water should be cool to warm. Turn the screen around and wash it through from the inside (printing side) until the emulsion washes away and the image is revealed.
Make sure you wash it enough so you actually see the open mesh that corresponds with the film positive. It will look milky at first and then open up and become clear. The screen should not feel slimy when you are done. That means that there is still a transparent residue left on the screen. Wash it again as that residue will drift into the open mesh and block the ink from going through. Remember too short an exposure and the emulsion will all wash away. Too long an exposure prevents all of your image from washing out. Dry your screen and you are ready to print.
Printing The Image
Attach HINGE CLAMPS (available at most art and printing suppliers) to a table or a sturdy board for printing the screen. They should be far enough away from each other to clamp onto each end of the screen. Place your screen into the hinge clamps and tighten them.
Check the screen for any areas that are not covered with emulsion. You can tape them out with clear packing tape. The only open areas of the screen should be the image that you washed out.
Have all your paper cut to size and ready to print. You need 2 straight edges, one horizontal and one vertical to ensure that you will have good registration. Tape your film separation onto a sheet of paper exactly where you want to print it. Then place the paper under the screen and line it up to the image on the screen. When it matches tape it down so it doesn’tmove while you set up the registration guides. I usually use three pieces of illustration board. Place 2 on the right side of the paper secured with masking tape. Other printers may use a punch hole method to register the paper. It is important that each piece of paper fits exactly into the registration guides so you print the color in exactly the same place on each sheet of paper.

Process Colors
I generally print the process colors with black first, cyan second, magenta third and then yellow. The black doesn’t need to be made more transparent but I do adjust the transparency of the other colors based on my original photo. You can usually judge if the color is too intense as you print each separation on top of the previous one by referring to your color printout. If so, cut the intensity with transparent base. It requires some proofing of the colors to get the right mix.
With the dog print I could control the green that I wanted by how transparent my yellow was. I also felt the black was the very last color at the end.
When you print halftone screens it is important to keep your squeegee at a 45 degree angle when you flood the screen and with the printing stroke. So to begin add some retarder to the ink to keep it from drying in the screen. You can use any acrylic retarder or propolene glycol. I like Golden’s Acrylic Retarder. It flows nicely. Add about 8-10%.
Lift and hold the screen up in front with a block of wood. Pour the ink in a nice ribbon from one side of the image to the other being careful to not let it go into the open area. Now take the squeegee and push the ink across the image away from you to the back of the screen (flooding). You should be able to see the ink filling the image. If you can’t see it you have pushed too thick a deposit of ink. Lower the screen and with nice even pressure pull all the ink toward you as you print it onto the paper. When you raise the screen and look at the print it should match the separation. If it’s not all there you didn’t print with enough pressure. If too much color is there you pressed too hard.
When you have finished printing all your paper scoop out the ink into a container and wash the screen with water. You can do that in a sink with a spray hose or on the table with paper towels and a container of water. Make sure you get all the ink out of the screen. The emulsion is removed with any strip made for removing emulsion. I like Nazdar’s ‘strip’.
Set up the screen with color separation #2.
Take the 2nd separation (cyan) and place it on one of the prints in register to the image.
Tape it down. Then line it up under the cyan screen so it matches, tape down your registration guides and print the cyan. Continue the same process for printing each color.
Stripping The Emulsion from The Screen
It is very important to remove all of the ink from the screen after you have finished printing. It is equally important not to wait too long after you have printed your last piece of paper. You don’t want the ink to start drying in the screen. Every company that makes emulsion recommends their emulsion remover but as I said before I like Nazdar’s with Bleach. Printers have used that for years but they then follow it up by cleaning any ink residue from their screens with acetone. Yuk. Bleach takes longer.

This is my method:
After my screen is free of any ink I remove it to a wash-up sink and spray it on both sides thoroughly with the Stripp. Make sure it is completely covered. You will start to see the emulsion loosen. Give it a minute and then stand it up in the sink and blast it with a pressure washer or a hose that has a lot of water pressure. It should start to wash away immediately. If it doesn’t dry on the screen before washing it off.
There is usually a ghost image or stain from the ink after the emulsion has washed away. I remove that with Simple Green cleanser and Baking Soda. Spray the Simple Green onto both sides of the screen. With the screen lying flat sprinkle a generous amount of Baking Soda onto it and scrub it with one of those green scrubbing pads that you use for dishes.
Scrub both sides of the screen. Blast it with the hose. It should all come out but if not repeat the process.
Probably the emulsion and ‘Stripp’ are the part of this process that requires protective measures (the material is a skin and respiratory irritant, but not very toxic) so I recommend wearing surgical gloves and using good ventilation. But you should not have to touch either one of those products.
Eye Wash Station from .labsafety.com. Wear googles, gloves and a plastic apron when stripping screen emulsion and ensure good ventilation.
Nazdar Stripp
is regarded as a particularly effective emulsion remover by silkscreen printers. As most emulsion removers, it contains Sodium Metaperiodate as the active ingredient (about 1 to 2 %). It is not recommended to purchase the chemical in its pure form as the metaperiodate crystals are highly corrosive and capable of causing severe skin or lung damage. Products that are sufficiently diluted and in liquid form are relatively safe to use (the product is non-carcinogenic, non-mutagenic, and non-neurotoxic), but prolonged exposure to the corrosive fumes needs to be avoided.
(Nazdar msds:) Use only with adequate ventilation. Use ventilation adequate to keep exposures below recommended exposure limits. See MSDS. In case of insufficient ventilation, wear suitable respiratory equipment. Ensure that eyewash stations and safety showers are close to the workstation location.
Nazdar.com The company make a wide variety of both solvent based and water based silkscreen ink systems. Today, a comprehensive set of msds sheets are available online for each product. Check all ingredients and safety measures before considering using any solvent based inks, as these have a much poorer safety record than waterbased products (the cancer hazard is significant, even for short term use).