by Donna Adams
The Beginners Compendium of Non-Toxic Intaglio Printmaking, Part I
1. Compared to Traditional Intaglio
Traditional Intaglio
Intaglio (from the Italian intagliare, to cut) is a category of printmaking techniques that create depressions in a flat metal plate to hold ink. Intaglio techniques include engraving, drypoint, mezzotint and aquatint. Traditional etching, the fastest and most preferred technique, requires exposure to toxic chemicals, including nitric acid to chemically etch exposed areas of the plate, and asphaltum to resist etching. After depressions are created, the indented plate is coated with ink and excess ink is wiped from the plate’s surface.

The inked plate is covered with a dampened sheet of paper and run through a press which pushes the paper into the plate’s recessions, transfers ink to the paper, creates a reversed image and embosses the paper. Reworking a traditionally etched plate is tedious and time-consuming.
The simplified cross-section (top right) represents the indented plate below the print. The paper shows the characteristic embossing which results from the pressure of the press. Thick lines represent ink transferred to the paper under pressure.
Intaglio-Type Non-Etch Intaglio
Keith Howard introduced the term Intaglio-Type to describe a broad range of non-etch intaglio techniques that do not require the toxic chemicals associated with traditional etching. Intaglio-Type relies on a photopolymer (i.e., light sensitive film) laminated to a flat plate, exposed to ultraviolet light through a stencil and developed in a mild solution of soft water. Ink is held differentially by the developed film and the image transfers in reverse onto paper under the pressure of the press. Plates are easily and quickly re-worked. The unaltered plate is recycled after the film is stripped away. The simplified cross-section (right) represents the developed film (blue) on the plate (below) and the printed paper (above). The paper shows the characteristic edge embossing which results from the pressure of the press. Thick lines on the paper represent ink transferred to the paper under pressure.
Intaglio-Type permits continuous-tone imagery as well as imagery similar to mezzotint and aquatint. Non-etch explorations with the photopolymer by Keith Howard and his students have revitalized printmaking by permitting unique imagery not previously imagined, including Wash-Drawing Intaglio-Type, Pastel Intaglio-Type, Spit-Bite Intaglio-Type, Mezzo Intaglio-Type, Stencil Intaglio-Type, Aquatint Intaglio-Type, Layered Intaglio-Type, Construction Intaglio-Type, Direct Intaglio-Type, Crackle Intaglio-Type and Wrinkled Intaglio-Type.
The following pages explore the processes and potential of Non-Etch Intaglio-Type.
2. ImagOn Photopolymer and Plates
ImagOn is a photopolymer film originally developed by Dupont for computer circuit boards; it permits etched as well as non-etch imagery unique to Intaglio-Type. As shown in the photo (right), ImagOn consists of a blue emulsion sandwiched between a soft peel-back layer (top of photo) and a crisp, clear Mylar (bottom of photo). This photopolymer has evolved over time. All generations of ImagOn function in basically the same way. The peel-back layer is removed so ImagOn can be laminated to a flat surface. A stencil is laid on the protective top Mylar surface and the plate is exposed to ultraviolet light.
The top Mylar is removed for development of the photopolymer in a mild solution of soft water. During development, the film is eaten away where the stencil blocked the ultraviolet light from the film; these areas hold ink. Areas exposed to UV light harden and do not hold ink. White vinegar neutralizes the developer and stops development.
Plates for ImagOn
For non-etch Intaglio-Type techniques, ImagOn is laminated to a flat, non-porous substrate. Traditionalists may prefer to laminate ImagOn to the metal plates associated with traditional intaglio. Newer, less expensive and more easily prepared plates are generally preferred, such as 0.022 gauge roofing copper, computer circuit boards or 0.03 ml thick P.E.T.G. (a thermoplastic). Plexi-glass is unsuitable since it contains oils that prevent lamination.
Plate Preparation
ImagOn will not adhere to oily surfaces, so any substrate must be degreased prior to laminating. Traditional plates require more edge preparation and degreasing.
Materials and equipment
Materials include a liquid dish detergent, such as Palmolive; sponge; paper towels; white vinegar in a spray bottle. Preparing traditional metal plates requires an electric finishing sander and 600-grit wet-dry sandpaper, a deburring tool, and a rat-tail file.
Preliminary steps for traditional metal plates
Bevel the edges with a deburring tool; or file, scrape and burnish to avoid harming the press. File the sharp corners to avoid harming the press and personal injury. Sand the surface with a circular motion of the rotary sander; use water to avoid the health hazard of creating dust.
Steps for all plates
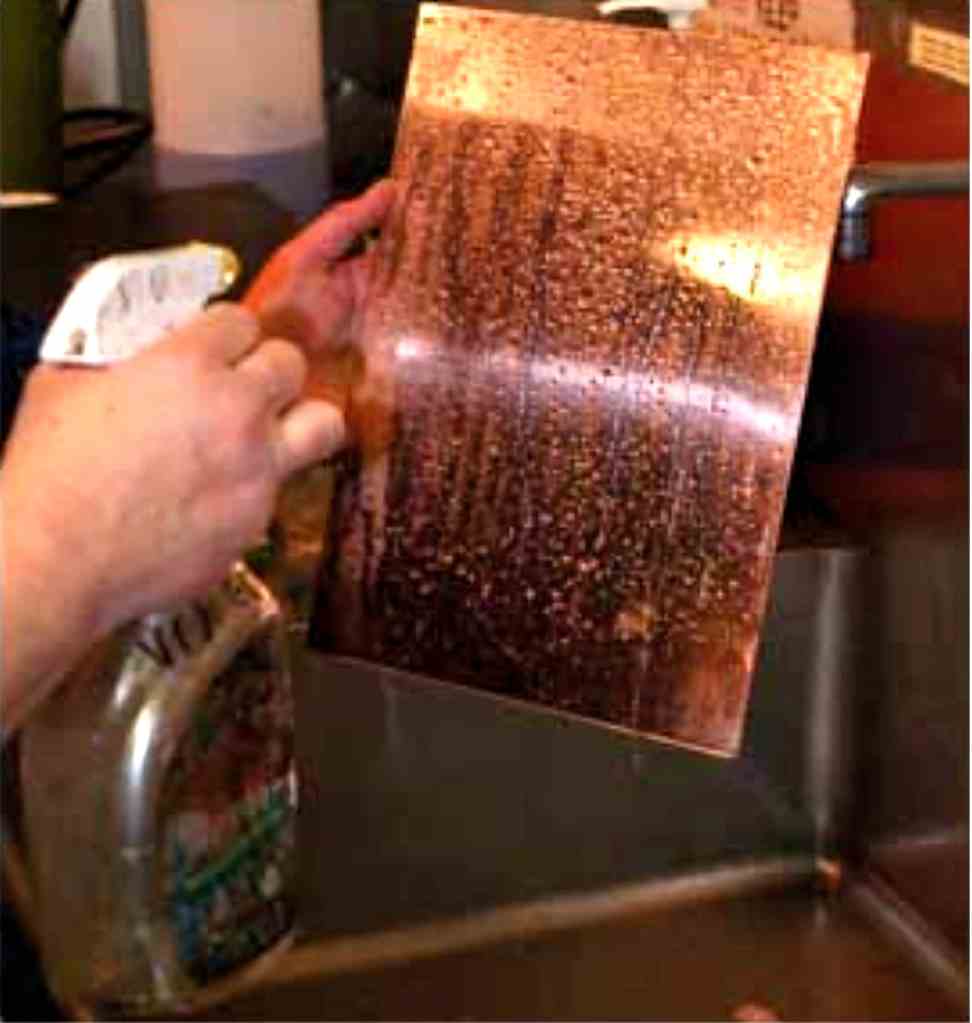
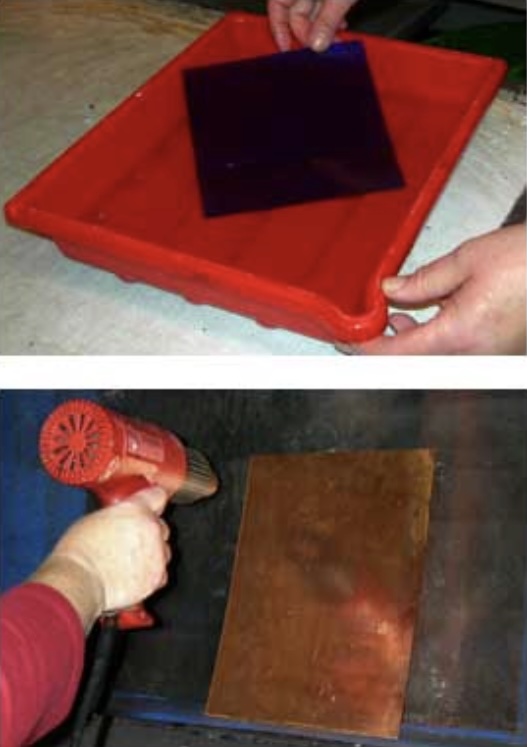
Wash the plate thoroughly with dish detergent. Rinse the plate with water. Degrease the surface by spraying liberally with white vinegar (photo opposite). Rinse; wipe dry with a clean paper towel.

detail: color intaglio type. La Tienda, Antigua, Guatemala, 2007 — 4-plate photopolymer intaglio-type with photo stencil, image size 18” x 24”, framed size 28” x 34”,
Intaglio Type
3. Spray Lamination
The first step in preparing ImagOn for Intaglio-Type is lamination to a prepared plate. Two basic methods are available for lamination: spray lamination and immersion lamination. Although the two methods are interchangeable, the spray lamination is generally preferred for smaller plates. For either method, work in a location far removed from direct sunlight to avoid exposing the photopolymer to ultraviolet rays that would fog the film.
Materials and equipment
Materials for spray lamination include: a clean, non-sticky and non-porous working surface, such as ¼ inch thick glass; brown packing tape or other 2 inch-wide tape; ImagOn; scissors; sharp knife with snap-off blades; water in a spray bottle; a prepared plate; and a 4 inch-long neoprene, medium-hard screenprinting squeegee.
Steps
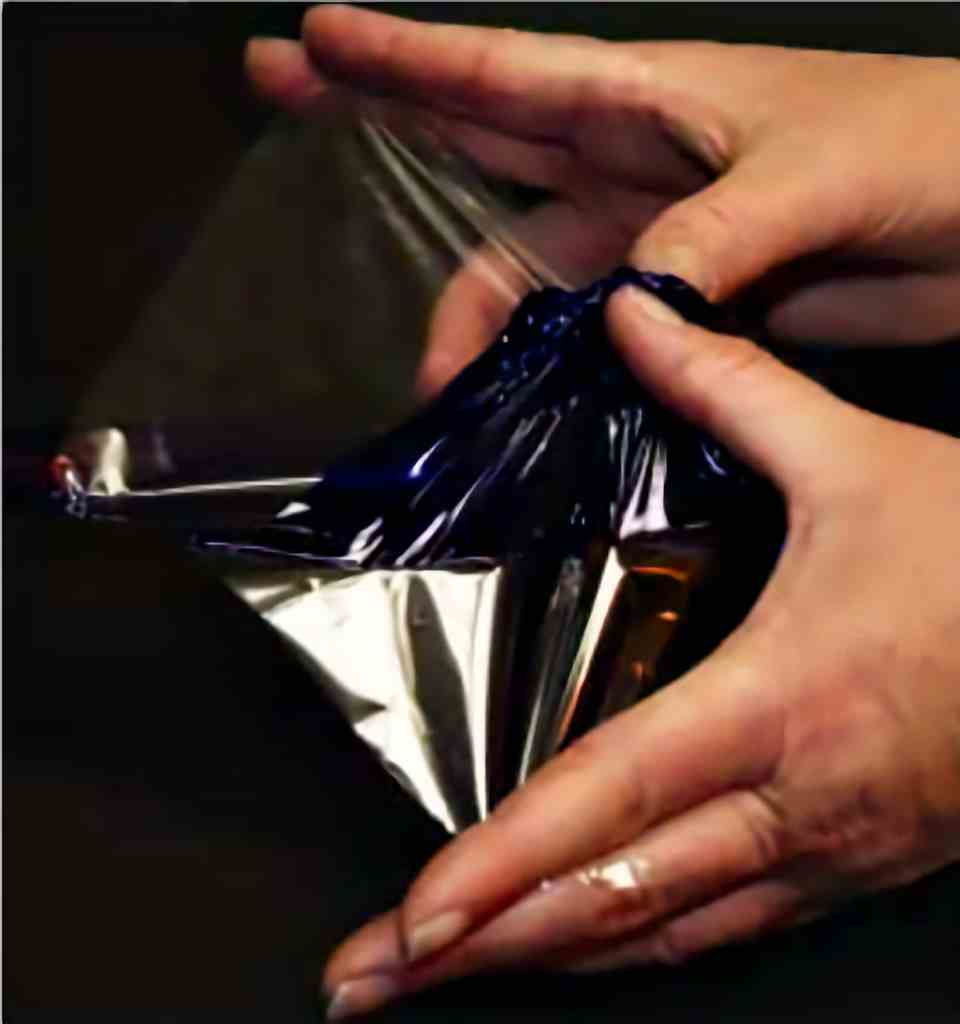
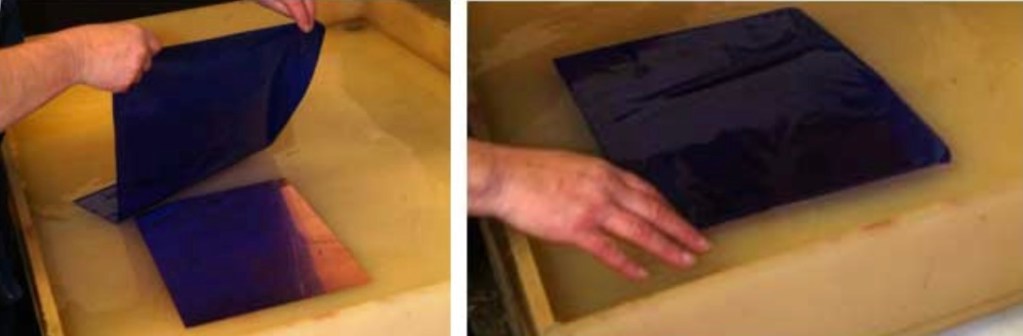
Place a 6-8 inch long section of 2 inch-wide packing tape sticky side up against the edge of the workspace. Hold the tape in place with a section of tape across each end. Cut a section of ImagOn slightly larger than the plate. Handle the film carefully to avoid causing creases or dimples that would interfere with bonding. Begin removing the soft peel-back layer by rubbing a corner of the peel-back layer against the tape (above left). Separate the corner of the film from the peel-back layer without disturbing the top Mylar (above right). Spray the work surface liberally with water.

- Place a prepared plate on the work surface and spray the plate liberally with water to aid in repositioning the film (above left).
- Place the film with emulsion facing up on the work surface and spray liberally with water to aid in repositioning, optional (above right).

- Gently position the film on the plate with the top Mylar facing up (above left). If wrinkles form or air bubbles
- develop, lift and reposition the film as necessary.
- Spray the top Mylar liberally with water to reduce friction (above middle).
- Adhere the emulsion with a squeegee using quick, light strokes; work from the center outward in all directions
- to remove any air bubbles (above right) Repeat, increasing pressure without introducing wrinkles in the film.
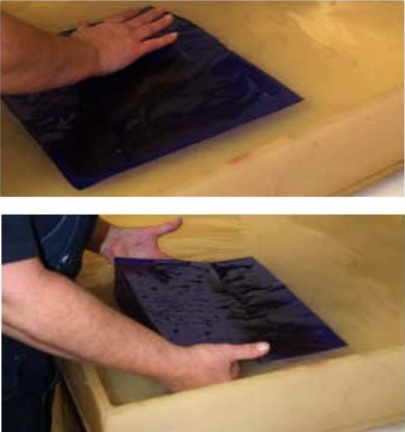
- Turn the plate over; trim the emulsion with a blade so the
- emulsion does not extend beyond the plate edge. Lift and
- discard trimmings (opposite).
- Turn the plate over so the top Mylar faces up and squeegee
- again.
- Push down on any remaining bubbles with a clean, lint-free
- cloth; pay particular attention to the edges (bottom photo).
- Pat both sides of the laminated plate dry with a paper towel.
- Heat dry the plate with a hand dryer or hair dryer at the
- highest setting for 1 minute per square foot from the back
- side first and then the front. Avoid this step for P.E.T.G. plates
- since they warp, and may even melt, with excessive heat.
- Run the laminated plate through the press with the top Mylar
- facing down to promote adhesion.
- Leave the plate in a cool, dark location overnight to increase
- bonding.
- The laminated ImagOn plate is now ready for exposure in the
- UV exposure unit.
Note: The exposed plate is usually developed immediately after exposure and the developer is made a day ahead for best results, so it is a good idea to make new developer on the same day that the plate is laminated.
Intaglio Type
4. Immersion Lamination
Immersion lamination is generally preferred for laminating ImagOn to larger plates. Remember to work in a location far removed from direct sunlight to avoid exposing the photopolymer to ultraviolet rays that would fog the film.
Materials and equipment
Materials and equipment for immersion lamination include: a clean, non-sticky and non-porous working surface, such as ¼ inch thick glass; brown packing tape or other 2 inch-wide tape; ImagOn; scissors; sharp knife with snap-off blades; tray larger than the plate; prepared plate; water in a spray bottle; and a 6 inch long neoprene medium hard screen-printing squeegee.

Steps
Begin by filling the large tray with fresh water. Be sure the tray is free of small particles that would interfere with adhesion. Place a degreased plate in the tray of water (above left). Position a section of 2 inch-wide packing tape approximately 6-8 inch long sticky-side-up against the edge of the workspace. Hold the tape in place with a section of tape across each end. Cut a section of ImagOn slightly larger than the plate. Handle the film carefully to avoid creating creases or dimples that would interfere with bonding. Begin removing the soft peel-back layer by rubbing a corner of the peel-back layer against the tape; separate a corner of the emulsion from the peel-back layer without disturbing the top Mylar. Pull back to separate the film and Mylar top from the peel-back layer (above right).
Position the film on the water over the plate (above left). Float the film on top of the water over the plate with the top Mylar facing up (above right). Pat the film to remove air bubbles beneath it (opposite, top photo).
Lift the plate and film together from the water. Lift from below to avoid crimping the film against the plate (opposite, second photo).
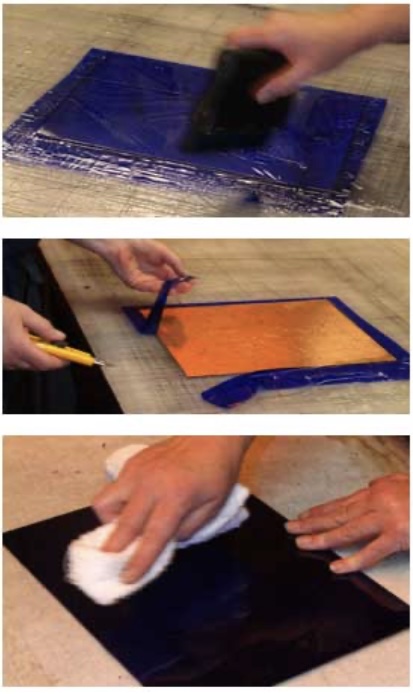
Position the plate and film on the work surface with the top Mylar facing up and spray the mylar liberally with additional water to reduce friction. Reposition the film as needed to remove air bubbles or wrinkles. Adhere the emulsion to the plate with a squeegee using quick, light strokes from the center outward to remove air bubbles and avoid wrinkles (opposite, third photo). Repeat, increasing pressure to promote bonding. Turn the plate over and trim the emulsion with the blade so it does not extend beyond the edge of the plate; lift and discard the excess film (opposite, fourth photo). Turn the plate so the top Mylar faces up and squeegee again. Push down on any remaining bubbles with a clean, lint-free cloth (bottom photo). Pay particular attention to any edge bubbles. Pat both sides of the laminated plate dry with a clean paper towel.
Heat dry the plate with a hand dryer or hair dryer at the highest setting for 1 minute per square foot from the back side first and then the front. For large metal plates, use a heat gun held at least 6 inches from the plate and move continuously to avoid melting the ImagOn. Avoid the heating step for P.E.T.G. plates since they warp, and may even melt, with excessive heat. Run the laminated plate through the press with the top mylar facing down to promote adhesion. Leave the plate in a cool, dark location for 24 hours to increase bonding. The laminated ImagOn plate is now ready for ultraviolet exposure.
Note: The exposed plate is usually developed immediately after exposure. The developer is made a day ahead; for best results, make new developer the day the plate is laminated.
Intaglio Type
5. Exposure Units
The laminated photopolymer plate is exposed to ultraviolet light with a stencil in place. A variety of exposure units (also called plate-makers) are available for this purpose. There are three requirements for an exposure unit. The unit needs a point-light source that emits ultraviolet light. (Note: a fluorescent light source does not work since fluorescent light is a soft light that burns under each dot of the stencil.) A vacuum system is required to ensure close contact between the photopolymer plate and the stencil so light cannot sneak under the stencil, which would burn out the image. An integrator measures the quantity of light emitted (i.e., light units) rather than the length of time light is emitted (i.e., seconds), which ensures that the amount of emitted light remains predictable and repeatable as the bulb ages. It is possible to construct your own exposure system but a variety of new or used exposure units are available.

(2025 edit: today, various types of LED UV curing lamps can be used instead)
Olec
Olec makes a variety of exposure units equipped with a light integrator. The light is positioned above the vacuum table.Lower-end models use a 1000- watt Quartz Halogen bulb; more expensive models use a metal halide bulb. The intensity and quantity of light is easily set with conveniently located buttons. After the plate and stencil are placed on the vacuum table, a glass cover is closed and the vacuum is pulled at the push of a button. The first photo (left) shows a desktop model. The larger model (middle photo) uses curtains to protect the user from the UV light.
NuArc
NuArc make flip-top exposure units. After placing the plate and stencil on the vacuum table, the user presses a button to pull a vacuum and then flips the vacuum table upside down so the plate faces the metal halide bulb located at the bottom inside the unit. Conveniently located buttons are used to set the light units and start the exposure. The bulb will not activate unless the vacuum table is flat so the user cannot be exposed to ultraviolet rays. The third photo (right) is a NuArc flip-top exposure unit.
Intaglio Type
6. Aquatint Screen Exposure
After the ImagOn is laminated to a prepared plate, the photopolymer is ready for exposure to ultraviolet light to create a latent image in the film. Some stencils require only one exposure, such as fine graphite stippling drawings, fine graphite line drawings, narrow text (less than 1/8 inch or so wide), and half-tone inkjet transparencies – stencils without solid, unbroken areas of black that would open bite. Other images require two exposures: the first with an aquatint screen and the second with the image stencil.
The Aquatint Screen
An aquatint screen is a stencil with an opaque random dot structure. The dots are organic and of variable sizes. An aquatint screen can be designed in PhotoShop and printed on an inkjet transparency but it is easily scratched. A more durable aquatint screen (designed by Elizabeth Dove) is printed with 70% coverage of organic, opaque, random dots at 2400 dpi on a film (vs. transparency) with an imagesetter laser. Handle an aquatint screen carefully by the edges. Clean it gently with soap and water or rubbing alcohol, as needed.
How an Aquatint Screen Exposure works
An aquatint screen exposure works in the same way aquatint works in traditional intaglio, to break up solid areas and avoid open biting. The simplified cross-section (right) represents an aquatint screen exposure. The aquatint screen is positioned emulsion-to-emulsion over the laminated ImagOn. The aquatint screen’s opaque dots block ultraviolet light from reaching the film during exposure (represented by the short arrow above the black dot) but ultraviolet light reaches the film in the spaces between the dots (represented by the long arrow). The film remains soft below the dots but hardens in the openings between dots. If no image exposure follows the aquatint screen exposure, the film comes off below the dots during development, creating valleys that hold ink so the entire surface appears as richly black as traditional mezzotint.

Standard Aquatint Screen Exposures
Once the standard aquatint screen exposure has been determined, follow these exposure steps: Turn the platemaker on so it warms up. Lift the lid on the vacuum table and position the ImagOn plate on the vacuum table with the Mylar facing up. Place the aquatint screen on the plate emulsion-to-emulsion. Set the platemaker for the standard light units as determined by the step-test, pull a vacuum, and make the exposure. Remove the aquatint screen and proceed to the image exposure.
Determining the Standard Aquatint Screen Exposure
A step test is necessary to determine the best aquatint screen exposure to produce the blackest black for each unique combination of platemaker and aquatint screen. Once determined, the exposure remains constant for all future aquatint screen exposures made with the same platemaker and aquatint screen.
Materials
The step-test requires: laminated ImagOn plate; ruler; fine-point magic marker; aquatint screen larger than the plate; 2 pieces of Rubylith or other opaque flat material cut large enough to cover the plate with at least 1 inch extra on all sides; and exposure unit.
Steps
Turn the platemaker on ahead so it warms up. Mark ½ inch or 1 inch divisions on the top Mylar. Lift the lid on the vacuum table and position the ImagOn plate on it with the Mylar facing up; close the lid. Place the aquatint screen on the plate emulsion-to-emulsion. Cover the bottom strip with rubylith so it is not exposed. Working from the bottom, cover all but the second division with the second rubylith. Set the platemaker for a 5 light units, pull a vacuum, and make the exposure. Move the two pieces of Rubylith to expose the third division from the bottom of the plate. Set the unit for 10 light units, pull a vacuum and expose the plate. Continue in this manner, adding 5 light units to each subsequent exposure. Develop and print the plate. Note the darkest black on the print. If two or more are equally dark, choose the one with the least light units. Repeat the process with 1-light-unit increments around the best exposure. Develop and print the second plate. Note the darkest black. If two or more are equally dark, choose the one with the least light units. This becomes the standard aquatint screen exposure for all future plates with this platemaker and aquatint screen. The photo (above right) is a print made from an aquatint screen step-test.
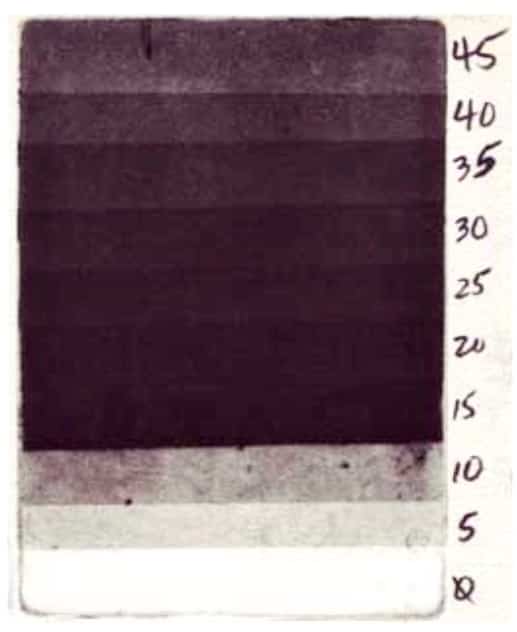
The bottom strip was not exposed; the top strip received 45 light units. The print is light in strips with low exposures where the plate did not receive enough light to harden. The print appears lighter again at high exposures where the plate hardened too much to hold ink well. The blackest tone appears at 15 light units. A refined one-unit step test followed from 13-19 light units. The standard aquatint screen exposure with this platemaker and aquatint screen was determined to be 19 light units.
Intaglio Type
7. Image Exposure
After ImagOn is laminated to a prepared plate, the photopolymer is ready for exposure to UV light with a stencil in place to create the latent image in the film. Image exposure immediately follows an aquatint screen exposure, if needed (See previous topic: Aquatint Screen Exposure).
Stencils
Any medium that permits light to pass through in some areas while blocking light in other areas can serve as an image stencil. Appropriate image stencils include graphite, charcoal or pastels on drafting Mylar, tracing paper, or typing paper rubbed with oil. Inkjet transparencies of photographs and xerographic copies on transparencies also work well. Flat objects, such as lace, leaves, Rubylith or torn paper can even serve as stencils. The best way to determine a medium’s suitability is to experiment!
The photo (right) shows a print made with an aquatint screen exposure followed by an image exposure with puzzle pieces positioned on the plate as the image stencil. The print is white where UV light reached the plate during image exposure and black where puzzle pieces blocked the UV light during image exposure.
How image exposure works
A properly exposed plate reveals the full tonal range of the image. Unexposed film comes off the plate during development, so an unexposed plate would print as white. Over-exposed film hardens too much to hold ink well.

The simplified drawing (left) shows the effect of exposure on light tonal values (the lower arch) and on dark tonal values (the higher arch). With no exposure, the print would show white for all tones in the image. Light tones do not need much exposure to achieve the correct value and, beyond that, they harden so much that they do not hold ink well so they print increasingly lighter until they print as white. Dark tones need a longer exposure to achieve the correct value and, beyond that, they also harden too much to hold ink well so they print increasingly lighter until they print as white. Under-exposed images do not develop rich blacks. Over-exposed images lose the light tones first and eventually the dark tones as well. For images with the full tonal range, a compromise may need to be made between keeping the light tones and achieving the richest black.
Open-biting is the term for areas falling off the plate during development because of insufficient exposure. Burn-out is the term for film that becomes so hard during exposure that it will not hold ink. Both result in white areas that should show tonality.
Step-tests for image exposures
Stencils have different densities to light so each image must be tested for the best exposure to produce its full tonal range. For best results, always make a step test for each new image, even when using a previously tested medium.
Materials
Image step-tests require: a laminated ImagOn plate (exposed with an aquatint screen if the image includes solid areas of black); image stencil; scotch tape; and two pieces of Rubylith or other flat, light-blocking material.
Steps
After removing the aquatint screen, position the image stencil on the plate emulsion-to-emulsion and tape in place. Position the Rubylith matte-side-down to cover all but the lowest one-sixth of the stencil; expose the bottom strip for 5 light units. Cover the exposed bottom section and reveal only the next one-sixth strip; expose this section for 10 light units. Continue individually exposing the four remaining sections in the same manner, adding 5 additional light units to each new section until all six sections have been exposed. Develop and print the plate to determine which exposure gives the best tonal range.
For best results, make a second step-test of 1-unit increments around the exposure with the largest tonal range. Note: occasionally, a very dense substrate requires more than 30 light units to yield a rich black; in this case, repeat the step-test process with stronger exposures.

The photo (top right) is an image step-test in process. The stencil is a graphite drawing on tracing paper. The image includes solid areas of black so the film received a standard aquatint screen exposure prior to the 5LU step-test for image exposure. Rubylith covers the bottom two sections that have already been exposed; a second piece of Rubylith covers sections not yet exposed. The photo (bottom right) shows a print made with a more refined step-test plate for the same subject.
Intaglio Type
8. Mix the Developer
After exposure with an image, develop the ImagOn plate in a mild, soft water solution of sodium carbonate (also called soda ash or washing soda) and water. Mix the developer a day ahead. To avoid sensitivity to soda ash, you may prefer to wear protective gloves when working with developer.
Materials
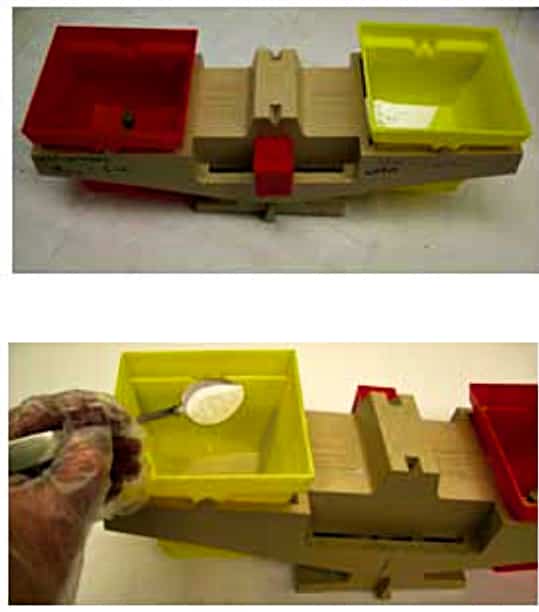
Mixing the developer requires: gram scale (top photo); protective gloves; spoon; stirring device; 1-liter marked measuring container; flat darkroom tray large enough for ImagOn plates; flat, opaque lid for the tray; anhydrous soda ash, available from printmaking suppliers, swimming pool suppliers, or from the grocery as washing soda.

Recipe
For water with a pH of 7, mix 10 grams anhydrous soda ash for each liter of water. Mix this proportion for the first batch of developer using the studio’s tap water. Adjustments will be made later.
Steps
Run tap water until it is hot; pour ½ liter of hot water in the measuring container. Spoon anhydrous soda ash into the gram scale until it measures 10 grams (second photo).
Add the measured soda ash to the container with hot water (third photo).
Stir until the soda ash is dissolved (bottom photo). Fill the container to 1 liter with room temperature water. Pour the water into the darkroom tray. Cover the tray. Leave the developer overnight so it comes to room temperature. Set the room temperature so the developer will remain between 65°- 70°F.
Testing the developer
Distilled water is pH7. If anhydrous soda ash were mixed with distilled water, the correct proportion would be 10 grams soda ash per liter of water. However, it is less expensive and more convenient to use studio tap water. The pH of tap water depends on the water supply, so the exact proportion of soda ash to water needs to be determined for your studio. This is a one-time test, unless the chemistry of the tap water changes. Begin the test with 10 grams soda ash per liter of water and make adjustments to the proportions depending on whether the studio’s tap water is hard or soft. After mixing the first batch of developer, proceed to the one-time developer test, which is the next topic.

Intaglio Type
9. Test the Developer
Test the developer for the studio’s tap water since the hardness of the water varies with location – this is a one-time test unless the quality of tap water or the studio changes. When testing the developer, work in low-level light away from open windows. Wear protective gloves. The ImagOn plate is never exposed or printed for the developer test.
Materials
Testing requires: protective gloves; 9 x 12 inch laminated ImagOn plate; 1 inch masking tape; blade; ruler; permanent marker; darkroom or kitchen timer; 10 grams per liter water developer mixed a day ahead (see previous topic); white vinegar in a spray bottle; paper towels; commercial hand dryer or heat gun.
Steps
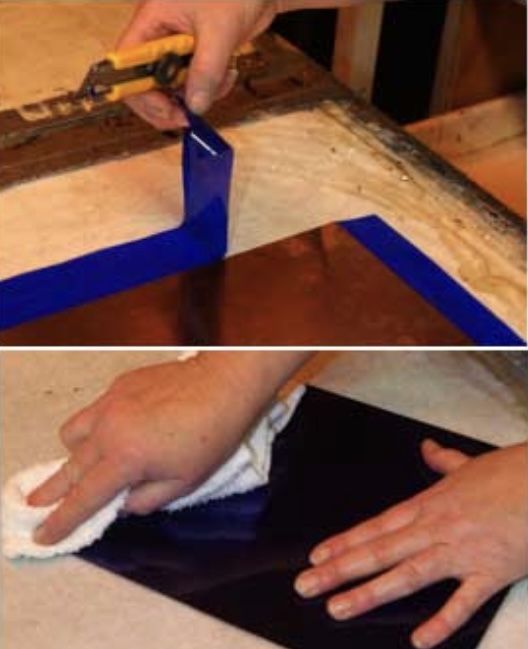
Pull back ½ inch of the top Mylar along one entire long edge of the laminated plate. Position masking tape on the film along the entire length of the plate below the pulled-back edge and fold the masking tape over to the plate’s backside. Fold a second piece of masking tape over the pulled-back edge of Mylar. Measure and mark ½ inch increments on the Mylar beginning with the taped edge. Cut through the tape and Mylar along the marked increments. With the marker, label the Mylar tabs sequentially 0, 1, 2, 3, etc., to 22. Label the masking tape below the tabs with matching numbers. The top photo is the plate ready for testing.
Set the timer for 22 minutes and activate it. Lift the tab and remove the entire strip of Mylar marked 22. Immediately insert the plate in the developer. Cover the tray for one minute. Uncover the tray. Remove the Mylar strip marked 21 without lifting the plate from the developer; cover the tray. Continue removing one Mylar strip for each minute until all but the 0 strip have been removed for one minute. Lift the plate from the developer; remove the strip labeled 0. The middle photo shows the removed Mylar strips.

Rinse the plate in cool water. Spray it with white vinegar and rub for 30 seconds. Rinse in cool water. Pat dry with a paper towel. Set the plate in sunlight to dry for half an hour. Examine the plate: 80% of the film should disappear by the strip marked 13; all film should be gone by 15. If this occurs, the standard developer in your studio is balanced at 10 grams of soda ash per liter of water. If the film disappears before the strip labeled 13, make a new developer solution with slightly less soda ash and re-test. If it disappears after 15, make a new developer with slightly more soda ash and re-test. The middle photo shows the strips after removal. The bottom photo is the developed plate.
Intaglio Type
10. Standard ImagOn Development
After the ImagOn plate is exposed, it is ready to be developed in the standard developer as determined by the one-time developer test; if you are not going to develop the plate immediately, store it in a cool, dark location. The mild soft-water developer solution of soda ash is slightly base. White vinegar is slightly acidic; it stops development and stabilizes the film. Note: A few intaglio-type techniques require a variation on standard tray development procedures; these variations will be indicated in topics discussing those techniques.
Materials
Developing requires: gram scale; spoon; long stirring device; 1-liter marked measuring container; an exposed ImagOn plate; flat darkroom tray larger than the ImagOn plate; flat, opaque lid for the tray; darkroom or kitchen timer; anhydrous soda ash; white vinegar in a spray bottle or ½ inch deep in a darkroom tray larger than the plate; sponge; paper towels; commercial hand dryer or heat gun.

Steps
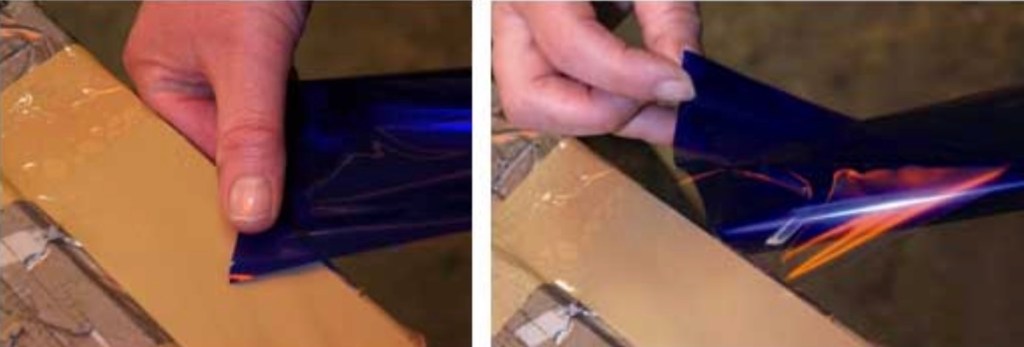
The day before exposing the plate and developing, prepare the standard developer as determined by the developer test. Cover the tray and leave it overnight. Expose the plate in the exposure unit. Set the timer for 9 minutes. Remove the top Mylar by rubbing it back from a corner and lifting off the film (top photo). Alternately, apply a small piece of masking tape to a corner of the Mylar and lift off. Immediately insert the plate in the soda ash solution and cover the tray. Turn the timer on. Do not disturb the developing plate. After 9 minutes, lift the plate from the developer and rinse the plate in cool water briefly (second photo).
Spray white vinegar over the entire plate or place the plate in a tray of white vinegar (third photo). Rub the vinegar over the entire plate surface. Rinse the plate in cool water briefly. Pat both sides of the plate dry with a paper towel. Heat-dry both sides of a metal plate with a commercial hand- dryer or a heat gun held at least 6 inches away (bottom photo). Be careful with the heat gun to avoid melting the film. Alternately, set the plate in sunlight for half an hour or more. Do not heat P.E.T.G. Leave the developed plate overnight in the studio to harden the film. The developed plate is now ready for inking and printing.