
Intaglio Type
11. Paper Preparation
Paper Choices
Atlantic Papers provides excellent mould-made deckle-edged papers for printing Intaglio-Type plates with Akua inks, including Hahnemühle Durer Etching, a 300-gm. 100% cotton paper, and Hahnemühle Copperplate, a 300-gm alpha cellulose fiber requiring minimal soaking. Hahnemühle Biblio, a thinner alpha cellulose fiber can be used for proofing plates. Akua inks may be printed dry with slightly more pressure during the printing process; this produces a more contrasted image without plate tone. The paper is usually printed damp, which produces a more complete tonal range and plate tone. Wetting requires less time for Akua inks than for oil inks: 1-15 minutes for Hahnemühle Copperplate.
Materials for paper preparation
Materials for paper preparation vary with the method: printing stock; tear bar; blotters or clean, dry, large white towel; Plexiglas drain board; window cleaning squeegee.
Steps for changing paper dimensions
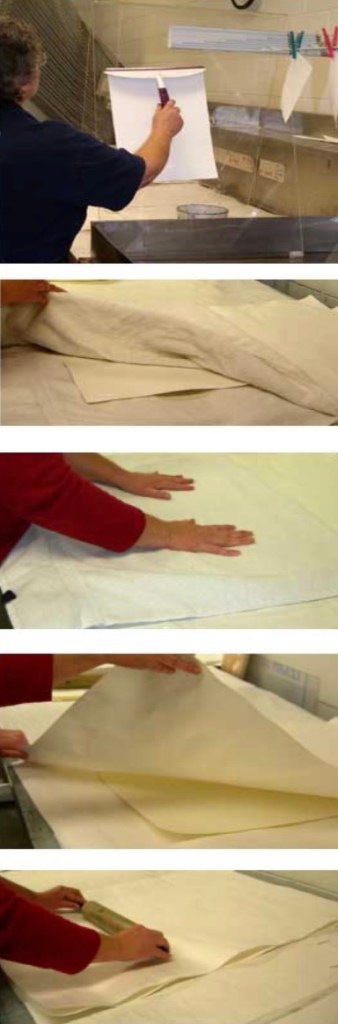
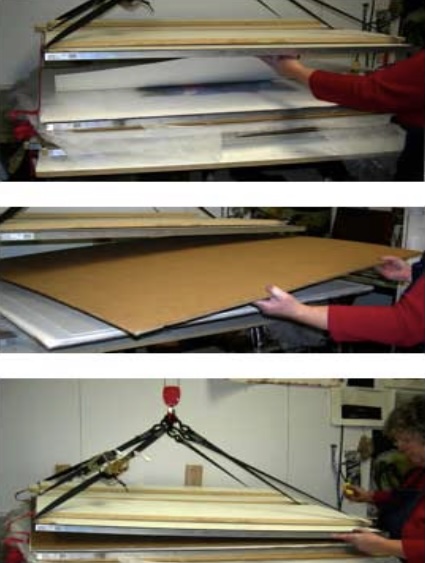
Hahnemühle Copperplate is available in sizes 22 x 30 inch or 31 x 47 inch but can be torn to smaller sizes with a tear bar. Stack the sheets of paper stock to be torn. Fold the top sheet of paper stock in half and then unfold it – this is easier than measuring the halfway point. Hold a tear bar with the sharp edge (or long straight edge) against the fold. Tear the paper to the desired size by lifting and gently pulling the top corner toward the sharp edge (below left).

Steps for making a wet pack
Prepare a wet pack a day ahead for consistent dampened sheets when they will be used within a couple of days. Always handle wet paper by two corners to avoid crimping the paper. For small sheets: insert the sheets in a wet sink or tray of water for at least one minute (middle photo). Stack the wet sheets on a clean surface or alternate wet and dry paper. Store the wet pack of small sheets in a plastic bag. Remove one sheet at a time and blot it with a towel or blotter paper as described below. Note: If necessary, the wet pack can be stored for up to a week in a refrigerator without growing mold or fungus.
For large sheets: Soak in water 15 minutes. Roll up the first sheet and lift it from the water; unroll on a clean surface. Squeegee each sheet with a window squeegee before stacking another. Cover the wet-pack with clean Plexiglas and weight the wet pack. Calendar each sheet just before printing: lay a sheet on the press, cover with clean paper, run through the press once (above right).
Steps for smaller damp paper
Another option is to prepare one sheet of small paper stock at a time. Insert a sheet of paper stock in water. Remove the sheet of paper stock from the water after 1 minute. Place the wet paper on a Plexiglas drain board and squeegee with a window-cleaning squeegee, if desired (opposite, top photo), or hold the paper over the water to drain it. Place the sheet in a folded clean towel (second photo). Press gently from the center of the paper outward in all directions until no shiny spots remain on the paper (third photo). The sheet of paper stock is now ready to print.
Steps for larger damp paper
Use the following method to prepare one large sheet of paper stock at a time. Insert one sheet of large paper in water. Remove the sheet of paper after 15 minutes. Place it between two blotters (fourth photo). Roll back and forth over the top blotter with a roller until no shiny spots remain on the paper (bottom photo). The sheet of paper stock is now ready to print. If the sheet will be used for multi-plate printing, lay it on a clean press and run it through the press once to calendar the paper before printing.
Intaglio Type
12. Ink the Plate
The ImagOn plate is ready to ink after it has been developed and left overnight to harden.
Akua Inks and Modifiers
Akua Intaglio inks are made with pigments in a soy binder. They are non-toxic, light fast, waterproof when dry and permanent. They contain no drier and do not form a skin. They are easy to apply, wipe, and clean up. Akua Intaglio inks can be stiffened by mixing in a small amount of Akua Oil Converter with a palette knife. To make them looser, mix in a few drops at a time of Akua Blending Medium with a palette knife. Colors may be used alone or blended. Add a couple drops of Akua Blending Medium to facilitate blending colors. Akua Transparent Base may be mixed in with a palette knife to reduce intensity.
Materials and equipment
In addition to inks and modifiers, inking the plate requires: glass or other smooth working surface; protective gloves; 2 x 2 inch sections of matboard or P.E.T.G. or a charge card; unsized tarlatan or 100% polyester pellon; phone book pages or newsprint.
Steps
Place the developed and hardened plate on the smooth workspace with the inks and other materials. Blend any colors and add any modifiers. Never add water to the inks. Stir the ink when beginning and every hour or so.
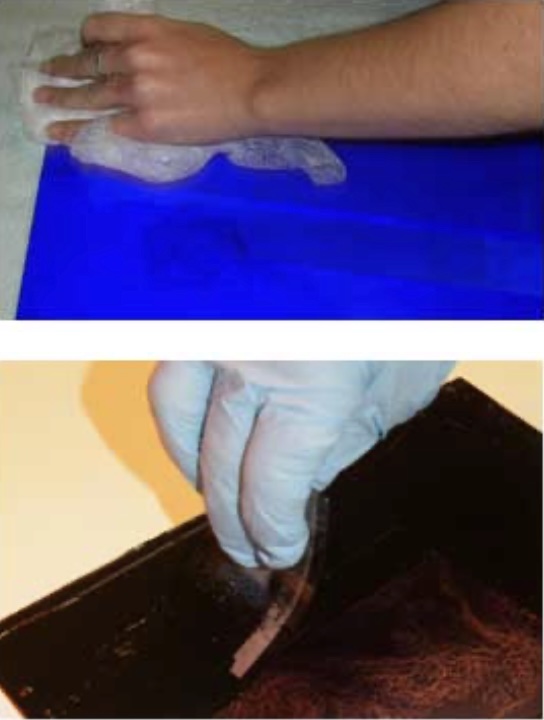
Before inking the plate the first time and between prints, wipe the plate with clean pellon or tarlatan (top photo). Dip one end of the matboard or charge card into the ink and spread a thin layer of ink on the plate (second photo). Wipe excess ink from the surface with unsized tarlatan or pellon using gentle pressure (third photo). Akua inks do not require the wiping pressure of oil-based inks.

Finish wiping with a new tarlatan or pellon; or do the final wipe with circular motion of newsprint or pages from a phone book (bottom photo). Note: if wiping yellow from the plate, prefer clean newsprint since phone book pages will color the ink. When inking and handling an inked plate, avoid touching the inked surface, which would leave fingerprint impressions in the print. Wipe the edges of the plate with a clean pellon. The inked and wiped plate is now ready to print. After printing, clean ink from surfaces and plates with soapy water followed by water.
Intaglio Type
13. Print the ImagOn Plate

When the inked plate is wiped and the paper is prepared, bring the plate to the etching press to pull a print.
The Press
A manual or electric etching press provides the pressure for printing. A sheet of Plexiglas covers the press bed to protect it.

A wool pusher blanket and a layer of vinyl are usually positioned under the roller but Keith Howard has also developed a rotational blanket system that keeps the blankets up out of the way when not printing (top photo).
Materials
Printing requires: an etching press, an inked plate, prepared paper, and clean newsprint.
Steps
Be sure the press bed and vinyl layer are clean. Lay a sheet of clean newsprint on the press bed. Place the inked plate on the newsprint (second photo). Place the prepared paper carefully over the inked plate. Use small folded pieces of paper or matboard to protect the paper from ink stains when handling the paper (third photo).
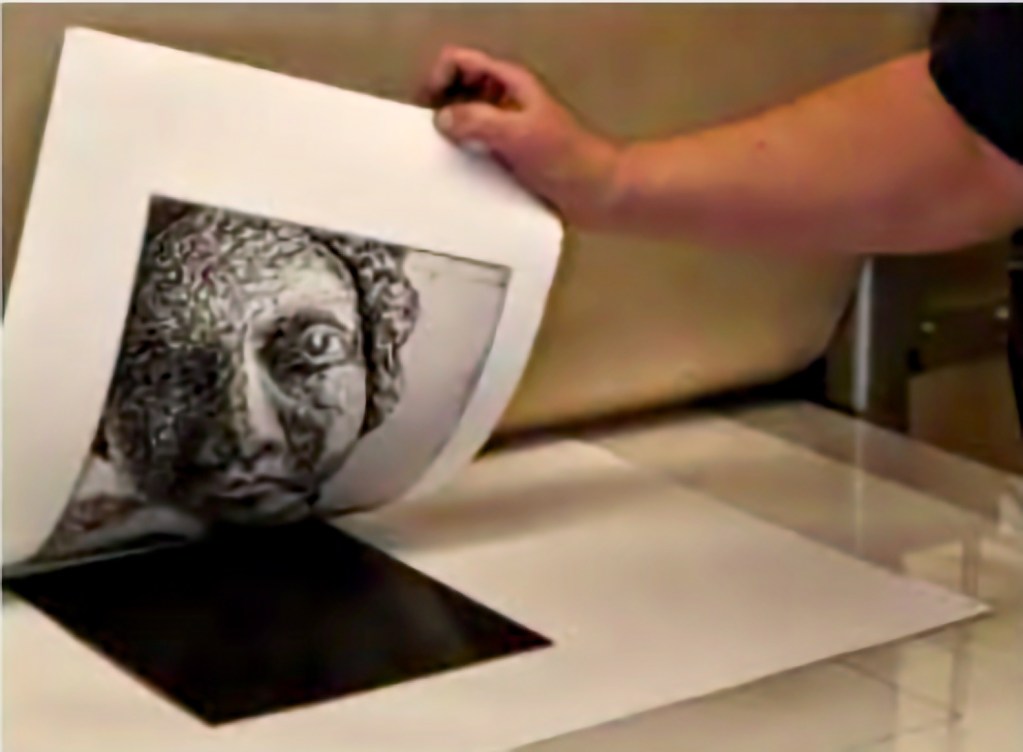
Electrically or manually run the plate through the press (fourth photo). Gently lift the print from the plate (fifth photo). It is now ready to be dried. Before leaving the press for the day, clean the press bed and vinyl with soapy water; rinse; dry with a clean paper towel. Take the pressure off the press when not in use.
Intaglio Type
14. Remove Akua Inks
Akua inks are easy to remove from plates and work surfaces after printing is completed.
Clean the plate
If the plate will be used again in the next few days, there is no need to remove ink from the plate surface. If the plate will be stored for a longer period of time or recycled, clean the plate.

Materials
Cleaning the plate requires: liquid dish detergent, such as Palmolive; sponge; paper towels.
Steps
Pour a few drops of liquid dish detergent on the plate. Rub with a wet sponge – gently if the plate will be reused (photo opposite). Rinse the plate. Pat the plate dry with a paper towel if the plate may be required for future printing. Store the plate in a cool, dry location for future use. If the plate will not be required for future printing, reclaim the plate by stripping the ImagOn photopolymer from the plate – see the next topic.
Clean other inky surfaces
After printing, clean ink from all work surfaces, the press bed, protective vinyl on press and any tools with soapy water.
Materials
Cleaning requires a liquid dish detergent; spray bottle; paper towels; clean, dry cloth rag (optional).
Soapy water recipe
Add approximately one part liquid dish detergent to six parts water in a spray bottle.
Steps
Spray soapy water on the inky surfaces. Remove ink and soapy water by gently rubbing with a sponge. Rinse with water on a sponge. Dry inky surfaces with clean paper towel or with a clean, dry cloth rag. Store the plate in a cool, dry location if it will be used again later. When the plate will not be required for later printing, recycle the plate.
Intaglio Type
15. Reclaim the Plate
When the image will not need to be printed again, remove ink from the plate and then strip the film from the plate. This permits recycling the plate. The stripping solution is merely a stronger solution of developer. Wear gloves when mixing stripping solution and removing plates from the stripper.
Materials and equipment
Stripping the plate requires: a measured container; stirring device; balance scales; soda ash (i.e., calcium carbonate, also called washing soda – the same chemical used in the developer); polypropylene tank or other container deep enough to cover plates; packing tape; scissors or blade; and clothes pins.
Stripping solution recipe
Add one part soda ash to four parts hot water by volume in a measured container. Stir until the soda ash dissolves. Pour the solution into a vertical polypropylene tank or other container deep enough to cover plates. Note: Stripping should take only a few hours. When stripping requires a longer period of time, discard the solution and make a new stripping solution. To avoid clogging the drain, insert a screen in the bottom of the sink to catch the stripped film when pouring old stripper down the sink.

Steps for stripping ImagOn from the plate
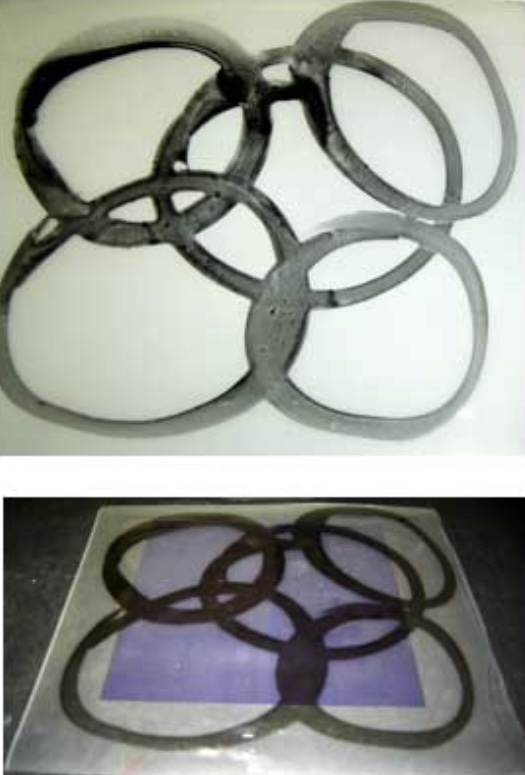
Cut a long section of packing tape. Make a tape handle on the back of the plate (top photo). Insert the plate into the stripper so it is covered by solution. Attach the plate’s tape handle to the side of the tank top with a clothes pin. Write your initials on the tape with a permanent marker if the studio space is shared. The photo on the left shows the tank; the photo on the right shows clothespins on initialed tape and the stripper, which has turned blue with use.
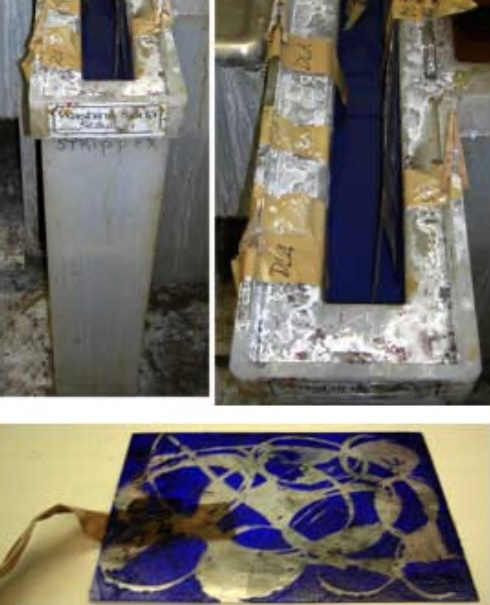
Remove the plate after an hour or so to check on the stripping progress. Reinsert if film remains. In the bottom photo, the stripper has removed the film areas that printed black on a P.E.T.G. plate but thicker film areas remain. When no film remains on the plate, lift the plate from the stripper. Remove the handle from the back of the plate. If this is difficult, insert the plate in hot water or heat it for tape removal. Rubbing alcohol can remove any remaining adhesive. Rinse the plate in room-temperature water. Dry the plate with a clean paper towel.

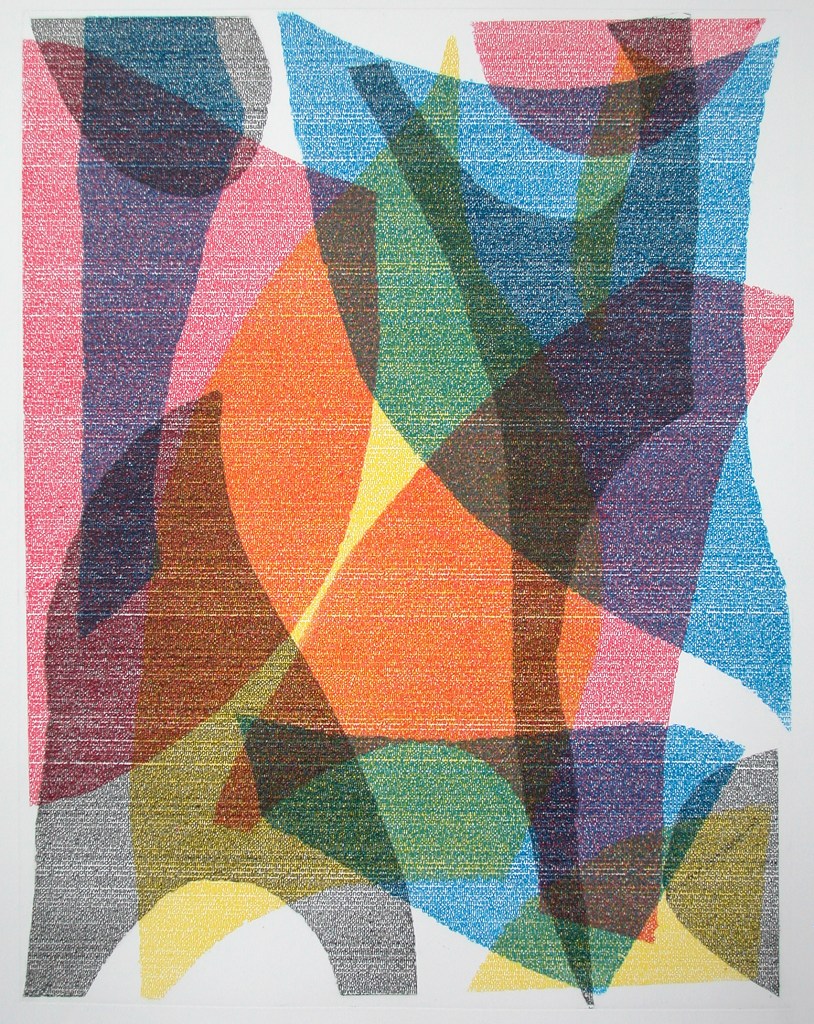
Storyboard: Fragments of My Childhood II, 2007 — 4-plate pieced photopolymer intaglio-type with text stencils, image size 18” x 24”, framed size 28” x 34”,
Intaglio Type
16. Drying the Print
Immediately after printing, place the wet print on a screenprinting drying rack (top photo) or dry the print under pressure. Prints that dry on the drying rack will need to be sprayed with water later and dried between blotters under boards with weights. Keith Howard has developed a drying system with an electrically run pulley that dries the prints flat.
Steps
Raise the top of the drying system. Place a clean sheet of cardboard on one of the drying boards. Place a clean blotter on the cardboard. Place the wet print on the blotter (second photo). Place clean pellon on the print (third photo). Place a clean blotter on the pellon (fourth photo). Place a clean sheet of cardboard on the blotter (fifth photo). Close the drying system by pushing the button (bottom). Prints can be stacked. When another print is ready to be dried under pressure, remove the cardboard and place the new print on the previous top blotter. Add a new pellon and blotter before returning the cardboard and closing the drying system.
Intaglio Type
17. Label and Touch-Up the Edition
Remove unwanted marks from the edition
Remove unwanted ink marks while still wet with a wet sponge. After the marks have dried, remove them with Scotch tape or, if that does not work, with an X-acto blade.
Materials
Touch-up requires: Scotch tape; an X-acto blade with a straight sharp edge; soft colored pencils, such as Pentel (or Prismacolor, which is slightly harder); and a bone burnisher, such as is used for matting artwork.
Steps to remove marks
Press a small section of tape against a white cloth to remove some adhesive. Repeatedly press tape against the dried ink mark and lift. This is a slow process. If the tape does not work, hold a blade with the flat, sharp edge against the paper and drag it slowly to lift a small amount of paper. Do not jab with the blade. Burnish with a bone burnisher to flatten the paper. Fill in any undesired white spots with a colored pencil.
Label the edition
Intaglio-Type prints are labeled (or signed off) in the same manner as other intaglio prints. After prints have been thoroughly dried and flattened, label with a #2 pencil just below the print. They are labeled ¼ inch below the print and writing does not extend beyond either side of the bottom plate mark.
Materials
Labeling requires a sharpened #2 pencil.

Steps
Lay out all the prints made with the same plate(s) and decide which should be included in the edition. Artists usually make 10% more than will be included in the edition. Title each print in the edition on the far left under the plate mark. Sign and date each print in the edition on the far right below the plate mark. In the center below the plate mark, write the print number (1, 2, etc.,), followed by a backslash, and then the total number of prints in the edition. For example, the print opposite is the best print in an edition of 5 so the print is labeled 1/5 in the center below the plate mark; other prints included in this edition are numbered 2/5, 3/5, 4/5 and 5/5. Prints with inconsistencies are labeled A.P. for Artist’s Proof rather than given a number in the edition.
IntaglioType
18. Toner-Wash Preparation
Wash drawings painted and/or drawn on a transparent or translucent surface create image stencils with painterly, spontaneous mark-making imagery. An especially effective wash media is Toner-Wash, which uses exhausted toner from copy machines or laser printers. These toners are approximately 90% thermoplastics and 10% carbon black pigment (Source: Nik Semenoff). Exhausted toner is readily available for recycling in Toner-Wash.
Materials and equipment
Toner-Wash preparation requires: used toner powder as the pigment; Future Acrylic Floor Polish as the binder; rubbing alcohol as the drying agent; window cleaner, such as Windex and/or soapy water (approximately 10 drops of liquid dish detergent per cup of water) in a spray bottle as the wetting agent; spoon for toner; stirring spoon or spatula for mixing; small container for mixing the Toner-Wash, such as a 1-cup yogurt container; paint brush; scrap of 0.003 single-sided drafting Mylar; dust mask to avoid inhaling toner powder; work surface covered with newsprint for easy clean up.
Recipe
1 part Future
1 part toner powder (or 2 parts)
1 part rubbing alcohol
1 part Windex
1 part soapy water (10 drops dish detergent per cup of water) Amounts are approximate and can be adjusted after testing the prepared Toner-Wash. Note: some formulas include either Windex or soapy water but this recipe includes both.
Steps for Toner-Wash preparation
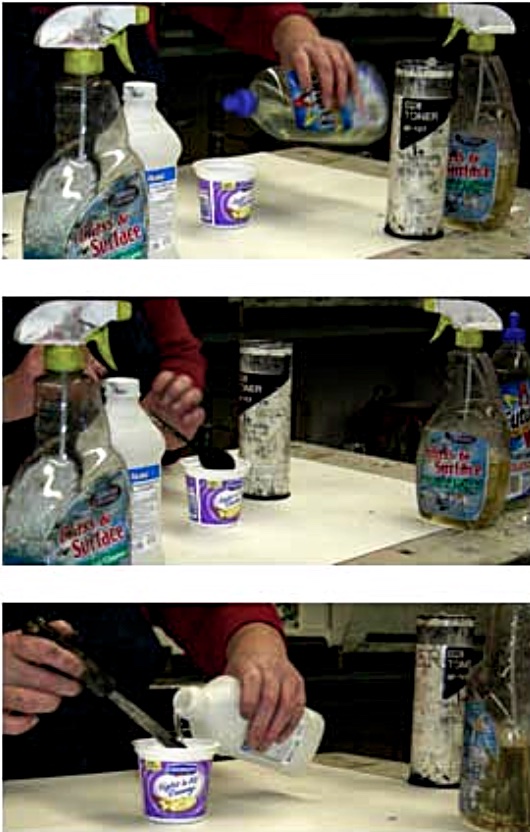
Pour 1 teaspoon Future into a 1-cup container (top photo). Add 1 or 2 teaspoons toner powder (second photo). Stir well. Punch a hole in the lid of a bottle of rubbing alcohol. Pour 1 teaspoon alcohol into toner mixture (third photo). Stir well. Add 1 teaspoon Windex to toner mixture (fourth photo). Stir well. Add 1 teaspoon soapy water to toner mixture (bottom photo). Stir well. Brush the prepared Toner-Wash on the emulsion side (i.e., dull, matte side) of a scrap of 0.003 single-sided drafting Mylar and set it aside to dry.
Examine the dried Toner-Wash for adjustments If the Toner-Wash wipes off the drafting Mylar easily – add more Future. If the Toner-Wash has no blacks – add more toner powder. To increase reticulation – add Windex or alcohol. Note: Unused Toner-Wash can be stored in a closed container for a few days; stir well before using.
Intaglio Type
19. Wash-Drawing Intaglio-Type
Wash drawings on a transparent or translucent surface produce stencils with painterly, spontaneous mark-making imagery for use with ImagOn photopolymer.
Wash-Drawing media and substrates
Wash media need to block light effectively to produce blacks in the print. India inks and felt-tip markers lack opacity. Fluoro Masking Ink, acrylic paints, gouaches and tusches work. Exhausted toner from copy machines or laser printers makes the most opaque toner-wash and can be diluted for a broad tonal range. Substrates should permit controlled dispersal of the wash media without buckling. Mylar and acetate do not permitcontrolled dispersal; vellum and paper buckle. Work on the dull, roughened surface of single-sided 0.003 drafting Mylar, frosted Lexan, Artex Textured Film, Grafix Textured Film or Hewlett Packard’s inkjet transparency.
Materials and equipment
Toner-Wash-Drawing requires: prepared Toner-Wash; spoon or spatula; paint brush and other mark-making tools; single-sided 0.003 drafting Mylar or other substrate; sharp blade; rubbing alcohol with a hole in the bottle’s lid; Windex in a spray bottle; small container of water; laminated ImagOn plate; aquatint screen.

Steps
Cut a section of single-sided 0.003 drafting Mylar and position with the emulsion side (i.e., matte, dull side) facing up. Draw and/or paint Toner-Wash onto Mylar. Apply the Toner-Wash diluted or undiluted. Spray Windex lightly on the drafting Mylar to increase reticulation, if desired. Pour a few drops of rubbing alcohol over the surface for a starburst effect, if desired. Set the drafting Mylar aside to dry (top, opposite). Remove any unwanted marks by scraping with the blade or dissolve with soda ash solution. Make an ImagOn test plate to determine the best exposure. Make a standard aquatint screen exposure. Remove the aquatint screen. Make an image exposure with the Toner-Wash-Drawing positioned emulsion-to-emulsion on the ImagOn plate (bottom, opposite). Follow standard procedures for developing, inking and printing the plate.
Toner-Wash-Drawing Intaglio-Type using Windex spray
The materials and steps are the same as for the previous Wash- Drawing Intaglio-Type. Cut a section of single-sided 0.003 drafting Mylar and position with the emulsion side (i.e., matte, dull side) facing up. Draw and/or paint Toner-Wash onto the drafting Mylar. Apply the Toner-Wash diluted or undiluted. Spray Windex lightly on the still-wet drafting Mylar to increase reticulation, (top, opposite). Set aside to dry. The bottom photo (opposite) is the dry drafting Mylar.
Make a standard aquatint screen exposure. Make an image exposure with the Toner-Wash-Drawing. Follow standard procedures for developing, inking and printing the plate.
Toner-Wash-Drawing Intaglio-Type with rubbing alcohol addition
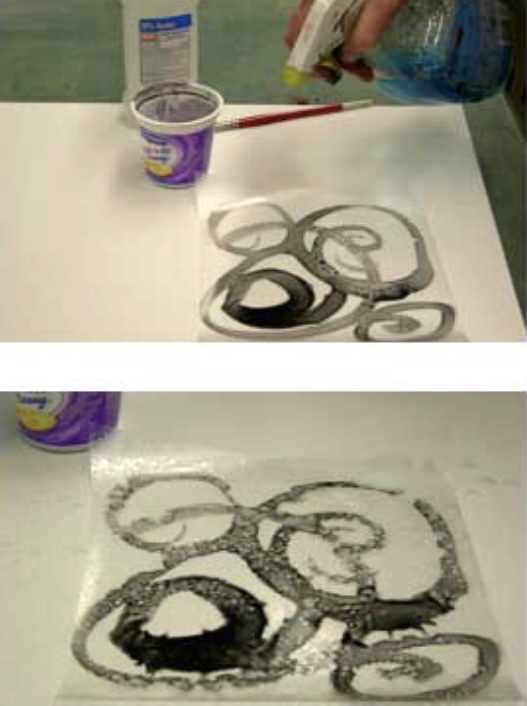
The materials and steps are the same as for the two previous examples of Wash-Drawing Intaglio-Type. Cut a section of single-sided 0.003 drafting Mylar and position with the emulsion side (i.e., matte, dull side) facing up. Draw and/or paint Toner-Wash onto the drafting Mylar. Apply the Toner-Wash diluted or undiluted. Pour a few drops of rubbing alcohol on the still-wet drafting Mylar for a starburst effect. The top photo (opposite) shows rubbing alcohol being poured from a hole in the lid of the alcohol bottle. Set aside to dry. The bottom photo (opposite) is the drafting Mylar after it has dried.
Make a standard aquatint screen exposure. Make an image exposure with the Toner-Wash-Drawing based on the results of a step-test. Follow standard procedures for developing, inking and printing the plate.
Nik Semenoff’s original toner wash process
Intaglio Type
20. Direct Intaglio-Type
Direct Intaglio-Type is Wash-Drawing Intaglio-Type with the Toner-Wash applied directly onto the protective Mylar of ImagOn film after an aquatint screen exposure. In Direct Intaglio-Type, the image stencil is in closer contact with the film than when a separate substrate is employed for the Toner-Wash.
Materials and equipment
Direct Intaglio-Type requires: prepared Toner-Wash; spoon or spatula; paint brush and other mark-making tools; rubbing alcohol with a hole in the bottle’s lid; Windex in a spray bottle; small container of water; prepared ImagOn plate; aquatint screen; standard materials and equipment for exposing, developing and printing a plate.

Steps
Make a standard aquatint screen exposure with a prepared ImagOn plate. Working away from direct sunlight, draw and/or paint Toner- Wash directly onto the ImagOn Mylar (top photo). Apply the Toner-Wash diluted or undiluted, as desired. Spray Windex lightly on the drafting Mylar to increase reticulation, if desired. Pour a small amount of alcohol over the surface for a starburst effect, if desired. Set the plate aside to dry in a cool, dark location for approximately 30 minutes. When the plate is dry, make an exposure of the Toner-Wash- Drawing using the light units determined by prior experience with Toner-Wash-Drawings. Remove the protective Mylar and set it aside (The bottom photo is the protective Mylar with the completed Toner-Wash- Drawing after removal from the ImagOn film.). Immediately insert the plate in the developer. After 9 minutes, rinse, spray with vinegar and rub it in, rinse, pat dry and heat dry the plate. Leave the plate overnight. The plate is ready to ink and print according to standard procedures.