
Intaglio Type
21. Mezzo-Type
Mezzotint (from the Italian mezzatinta, halftone) is a traditional intaglio method for working from blacks to whites. First, a spiked tool is rockedin all directions over the metal plate to produce an all-over pitting which prints velvety black; then areas of the surface are scraped and burnished to produce modulated tones from grays to white with the velvety black. Mezzotint is the most laborious intaglio process. The same effect is achieved quickly and easily with Mezzo-Type, an Intaglio-Type process that begins with a dry, aquatinted and developed ImagOn plate. Various dilutions of screenfiller are painted on the dry plate to produce the complete tonal range – the thicker the screenfiller application, the whiter the tone. Mezzo-Type can also be used as a reworking technique to introduce whites into dark areas.
Materials and equipment
Mezzo-Type requires: dry ImagOn plate exposed with an aquatint screen and developed; Speedball screenfiller or other liquid acrylic; small container of water; brushes and painting tools.
Additive Mezzo-Type
Apply screenfiller to a plate after exposing with an aquatint-screen and developing.
Steps
- Begin with a dry ImagOn plate that has been exposed with
- an aquatint screen and been through the complete
- development process and left overnight to harden. At this
- point, the plate would print a velvety black.
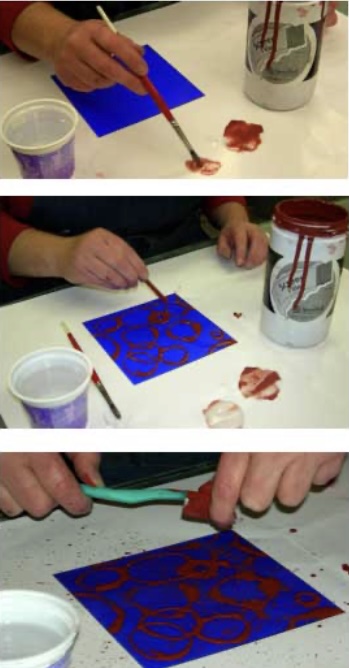
- Mix dilutions of screen filler in small containers, on a palette,
- or on the work surface (top photo).
- Apply screenfiller straight or diluted to the plate — undiluted
- for white, more and more diluted for darker and darker grays.
- Charge the brush with water to further dilute the screenfiller or paint water on the plate to produce a wash effect.
- Various tools can be used to apply screenfiller besides brushes. In the second photo, screenfiller is applied with an eye dropper. In the third photo, undiluted screen filler is flicked from a toothbrush onto the plate.
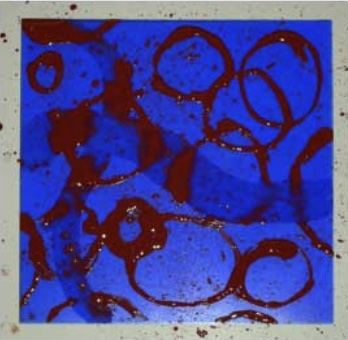
- The bright cross on the left of the plate in the bottom photo is a still-wet thin wash of very dilute screenfiller applied with a brush. The thick circles were made with an eye dropper and the small dots with flicks of a toothbrush.
- Set the plate aside overnight to dry. Dry the screenfiller
- completely before inking and printing. If the screenfiller is
- thick, reduce the pressure on the press slightly for printing.
Embossing with Additive Mezzo-Type
Additive Mezzo-Type embosses the print – a quality that permits creating a non-inked image characterized by white-on-white embossing. The heavier the application of screenfiller, the deeper is the embossing.
Materials and equipment
Embossing Mezzo-Type requires: dry ImagOn plate exposed with an aquatint screen and developed; Speedball screenfiller; brushes and painting tools.
Steps
- Apply screenfiller to the plate with a brush and/or eye dropper.
- Heat dry. Set the plate aside to harden.
- Do not ink the plate.
- Place the plate on the press, cover with damp printing stock, and run through the press.
- Dry the plate without pressure.
Note: The plate can be inked for printing after all embossed images are produced. Once the plate is inked, it cannot be used for purely embossed images since a small amount of ink remains on the plate after cleaning and this ink would transfer during embossing. The photo (right) is the plate for white-on-white embossing made with multiple applications of screenfiller.
Additive Wet-on-Wet Mezzo-Type
Screenfiller is water-soluble when wet and waterproof after it dries; screenfiller dries from the edges inward. These two qualities permit the creation of double lines. Paint screenfiller with a brush or eye dropper and rinse it off after the edges dry. The sooner screenfiller is rinsed off after the edges dry, the finer the line. Entire images can be built up in this way.
Steps
- Begin with a dry ImagOn plate that has been exposed with
- an aquatint screen, and left overnight to harden. At this point,
- the plate would print a velvety black.
- Apply undiluted screenfiller with a brush or eye dropper or
- flick it onto the plate.
- When edges appear dry, rinse the plate with cool water.
- Pat dry, heat dry, and rework as desired.
- Pat dry. Heat dry. Set the plate aside overnight to dry. Dry the
- screenfiller completely dry before inking and printing. If the
- screenfiller is thick, reduce the pressure on the press slightly
- for printing.
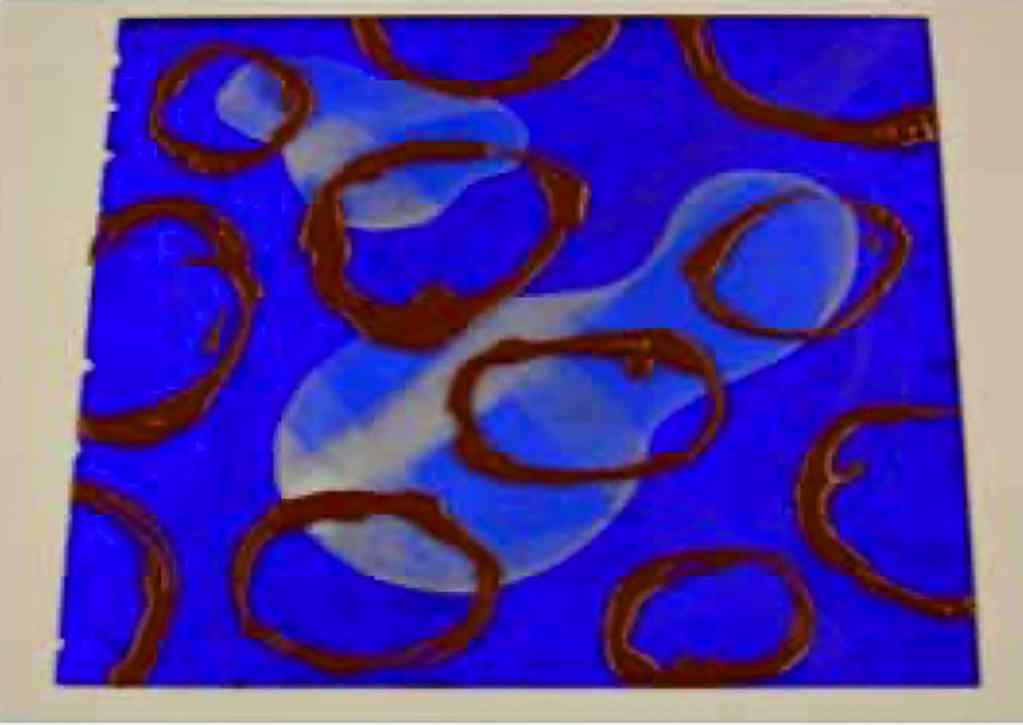
States for an Additive Wet-on-Wet Mezzo-Type
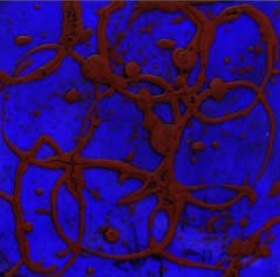
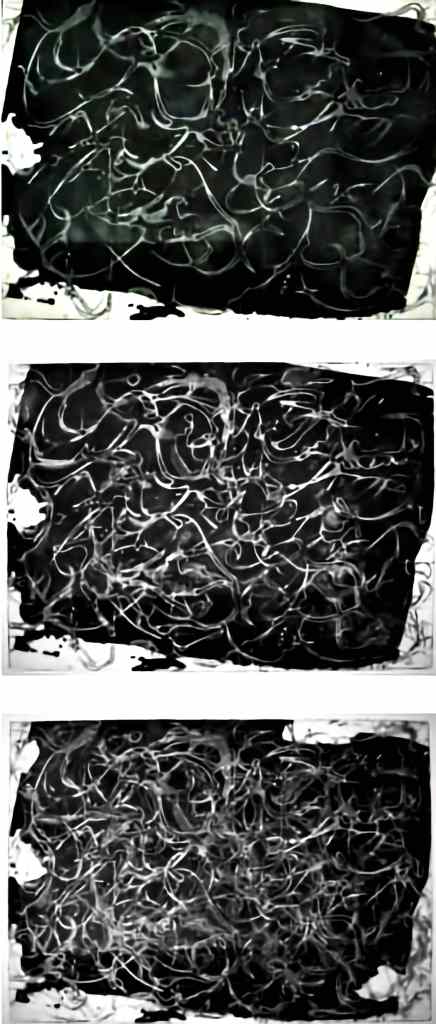
The top photo is the first state for a print using Additive Wet-on-Wet Mezzo-Type as the main technique. First the edges of the plate were broken up with spit-bite. Then a wash of very dilute screenfiller was applied. Screenfiller was applied with an eye dropper. When the edges of the lines dried, the plate was rinsed and dried. The second photo shows the second state for the print. More screenfiller applications with an eye dropper were rinsed after the edges dried. The plate was dried again. The third photo shows the third state for the print. Spit-bite was applied to break up the edges. More screenfiller applications with an eye dropper were rinsed after the edges began to dry to increase the complexity of the line imagery.
Reductive Mezzo-Type
In reductive Mezzo-Type, the aquatinted emulsion is worn down with snake slip or wet-dry sandpaper used dry. Worn down emulsion prints lighter tones.
Intaglio Type
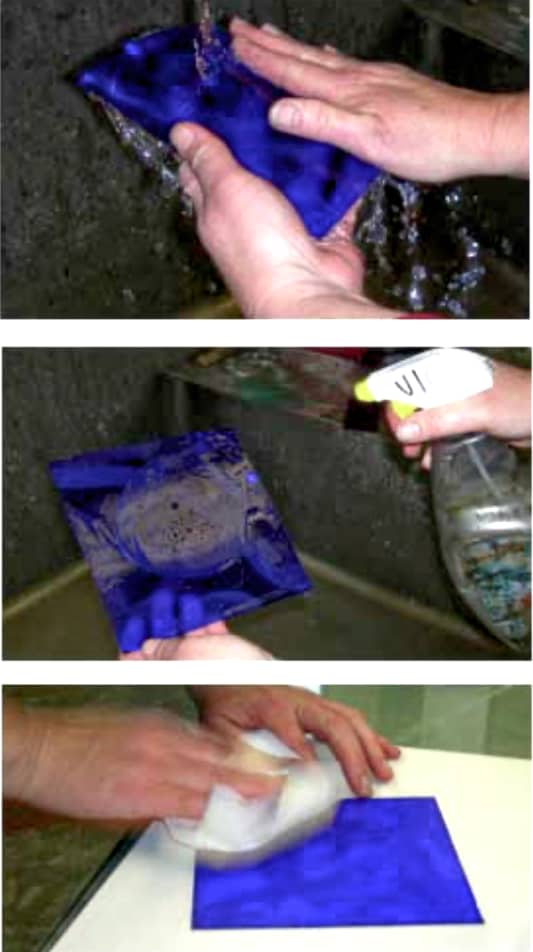
22. Spit-bite Intaglio-Type
In traditional intaglio, spit-bite is a technique for hand-developing areas on an etched plate; the etching solution is mixed with spit, soap, or Gum Arabic and painted onto areas of the plate for an irregular, soft, wash-like appearance in the print. Spit-bite Intaglio-type is a hand-developing technique that permits spontaneous drawings and/or wash-like effects on an ImagOn plate with various concentrations of soda ash developer.
Materials and equipment
Spit-bite Intaglio-Type requires:
3 lidded, 1-liter glass containers labeled mild, medium, and strong, respectively; balance scale; soda ash; stirring device; laminated ImagOn plate; painting and drawing tools; water in a small container; vinegar in a spray bottle or tray; paper towels.
Spit-bite developer concentrations
- Mild solution: 10 grams soda ash per liter of water.
- Medium solution: 25 grams soda ash per liter of water.
- Strong solution: 50 grams soda ash per liter of water.

Steps
- Add ½ liter hot water to each container. Measure the soda ash for each
- concentration and add to the respective containers. Stir until the soda ash dissolves. Add water to bring the
- solutions to 1 liter. Cover and set aside overnight.
- Expose a laminated ImagOn plate with the standard aquatint screen exposure.
- Remove the protective Mylar (top photo).
- Selectively hand develop the plate: paint or draw with the mild spit-bite concentration, then the medium, and lastly the strong concentration (second photo). Work on a dry plate or charge the brush with water to make a wash effect.
- To avoid eroding ImagOn-Rapid film, do not exceed: 8 minutes for the mild solution, 4 minutes for the medium, and 2 minutes for the strong solution. ImagOn-PRO is 1.5 times thicker so the spit-bite can remain almost twice as long.
- Rinse the plate with cool tap water (third photo).
- Spray with vinegar (fourth photo). Rinse. Pat dry with a paper towel (bottom photo). Heat dry.
- Leave the plate in the sun for 30 minutes or expose it in the platemaker for the same amount of time as a standard aquatint exposure. Set aside overnight before inking and printing.
- If areas print too light, rework the plate with more spit-bite solution in the same manner.
Intaglio Type
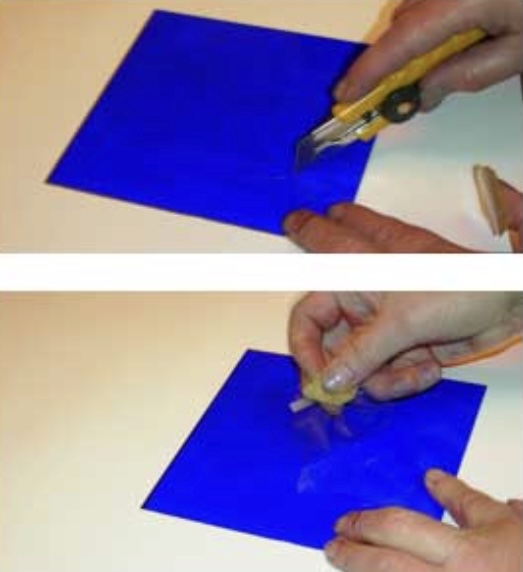
23. Stencil Intaglio-Type
Stencil Intaglio-Type combines techniques used in Mezzo Intaglio-Type and Spit-bite Intaglio-Type. Part of the Mylar remains in place for tray- development, which produces rich black shapes; the rest of the Mylar is removed for hand-developing with spit-bite to produce dark tones and applying screenfiller to produce light tones.
Materials and equipment
Stencil Intaglio-Type requires: laminated ImagOn plate; dry-erase marker; sharp knife with snap-off blades; packing tape; mild, medium and strong spit-bite concentrations; painting and drawing tools; vinegar in a spray bottle or tray; paper towels; Speedball screenfiller; small container of water.
Steps
- Make a standard aquatint screen exposure with a prepared ImagOn plate. Do not remove the Mylar!
- On the Mylar, mark shapes for removal (optional). Cut shapes
- in the Mylar for removal (top photo); do not cut through the
- emulsion.
- Oxygen affects emulsion. Remove the cut Mylar shapes only
- after all are cut. Lift the cut Mylar shapes with a small piece of packing tape (second photo). Leave the remaining Mylar in place.
- Immediately tray develop the plate; areas with Mylar in place
- will not develop. Rinse; apply vinegar; rinse; pat dry; heat dry. The third photo is the developed plate.

- Remove the remaining Mylar. Apply spit-bite, working from mild to strong. Protect developed shapes from open bite with Vaseline, if desired. The fourth photo is the plate with spit-bite.
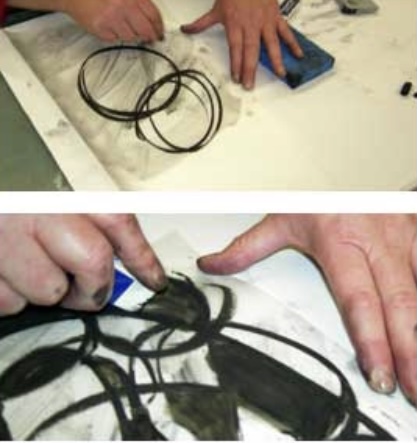
- Spit-bite dissolves screenfiller so complete spit-biting before applying screenfiller. To integrate the rich black areas with the white, consider outlining the cut stencils with screenfiller or softening their edges with spit-bite. The bottom photo is the plate with screenfiller applied.
24. Pastel Intaglio-Type
Create an effective stencil for ImagOn with black pastel or charcoal worked wet-on-wet and dry-on-wet on 0.003 drafting Mylar (or other transparent or translucent substrate).
Materials and equipment
Pastel Intaglio-Type requires: charcoal or black pastel, such as Alphacolor Char-Kole, a rich black pastel stick; 0.003 drafting Mylar (or other suitable wash-drawing substrate); sponge; vinyl eraser; kneaded eraser; paper towels; small container of water; aquatint screen; laminated ImagOn plate.
Steps
- Cut a section of single-sided 0.003 drafting Mylar and position with the emulsion side (i.e., matte, dull side) facing up.
- Sponge water on the drafting Mylar.
- Begin drawing with the black pastel on the drafting Mylar (top photo).
- Work back and forth, wet and dry: create a wash in areas by dropping water from a sponge onto the drawing; create lighter tones by rubbing with a sponge, kneaded eraser, vinyl eraser (second photo) or paper towel; create darker tones by drawing back in with charcoal.
- Set the drawing aside to dry if it is still wet. The third photo is the completed pastel drawing.
- Make an ImagOn test plate to determine the best exposure.
- Make a standard aquatint screen exposure. Remove the aquatint screen.

- Place the drafting Mylar emulsion-to-emulsion on the ImagOn plate. Make an image exposure for the pastel drawing (bottom photo).
- Follow standard procedures for developing, inking and printing the plate.
Intaglio Type
25. Line Intaglio-Type
Line drawings can become image stencils for non-etch Intaglio-Type. Graphite works well, but any drawing medium with opacity to UV light can be used; this is an area open to experimentation. Single-sided drafting Mylar is a substrate that accepts graphite without a long image exposure; tracing paper and double-sided Mylar work as substrates but these substrates require a longer exposure. Lines less than 1/8 inch thick do not require an aquatint exposure prior to image exposure. Line drawings with solid areas require an aquatint exposure to avoid open biting.
Materials and equipment
Line Intaglio-type requires: 2B and 4B graphite; single-sided 0.003 drafting Mylar; two laminated ImagOn plates (one for testing); standard developing, inking and printing supplies.
Steps
- Make a line drawing with 2B and 4B graphite on single-sided .003 drafting Mylar.
- Make a step-test of image exposure with one laminated plate.
- Develop, ink, and print the step-test in the standard manner.
- Determine the best quantity of light units.
- Make an image exposure of the remaining laminated ImagOn plate with the line drawing emulsion-to-emulsion.
- Tray develop the plate. Rinse. Spray vinegar. Rinse. Pat dry with a paper towel. Heat dry, sun dry, and/or expose on the platemaker for the quantity of light units required for a standard aquatint exposure.
- Set aside overnight before printing the plate.
The photo shows a print made with graphite line drawing on single-sided 0.003 drafting Mylar as it comes off the press.
Intaglio Type
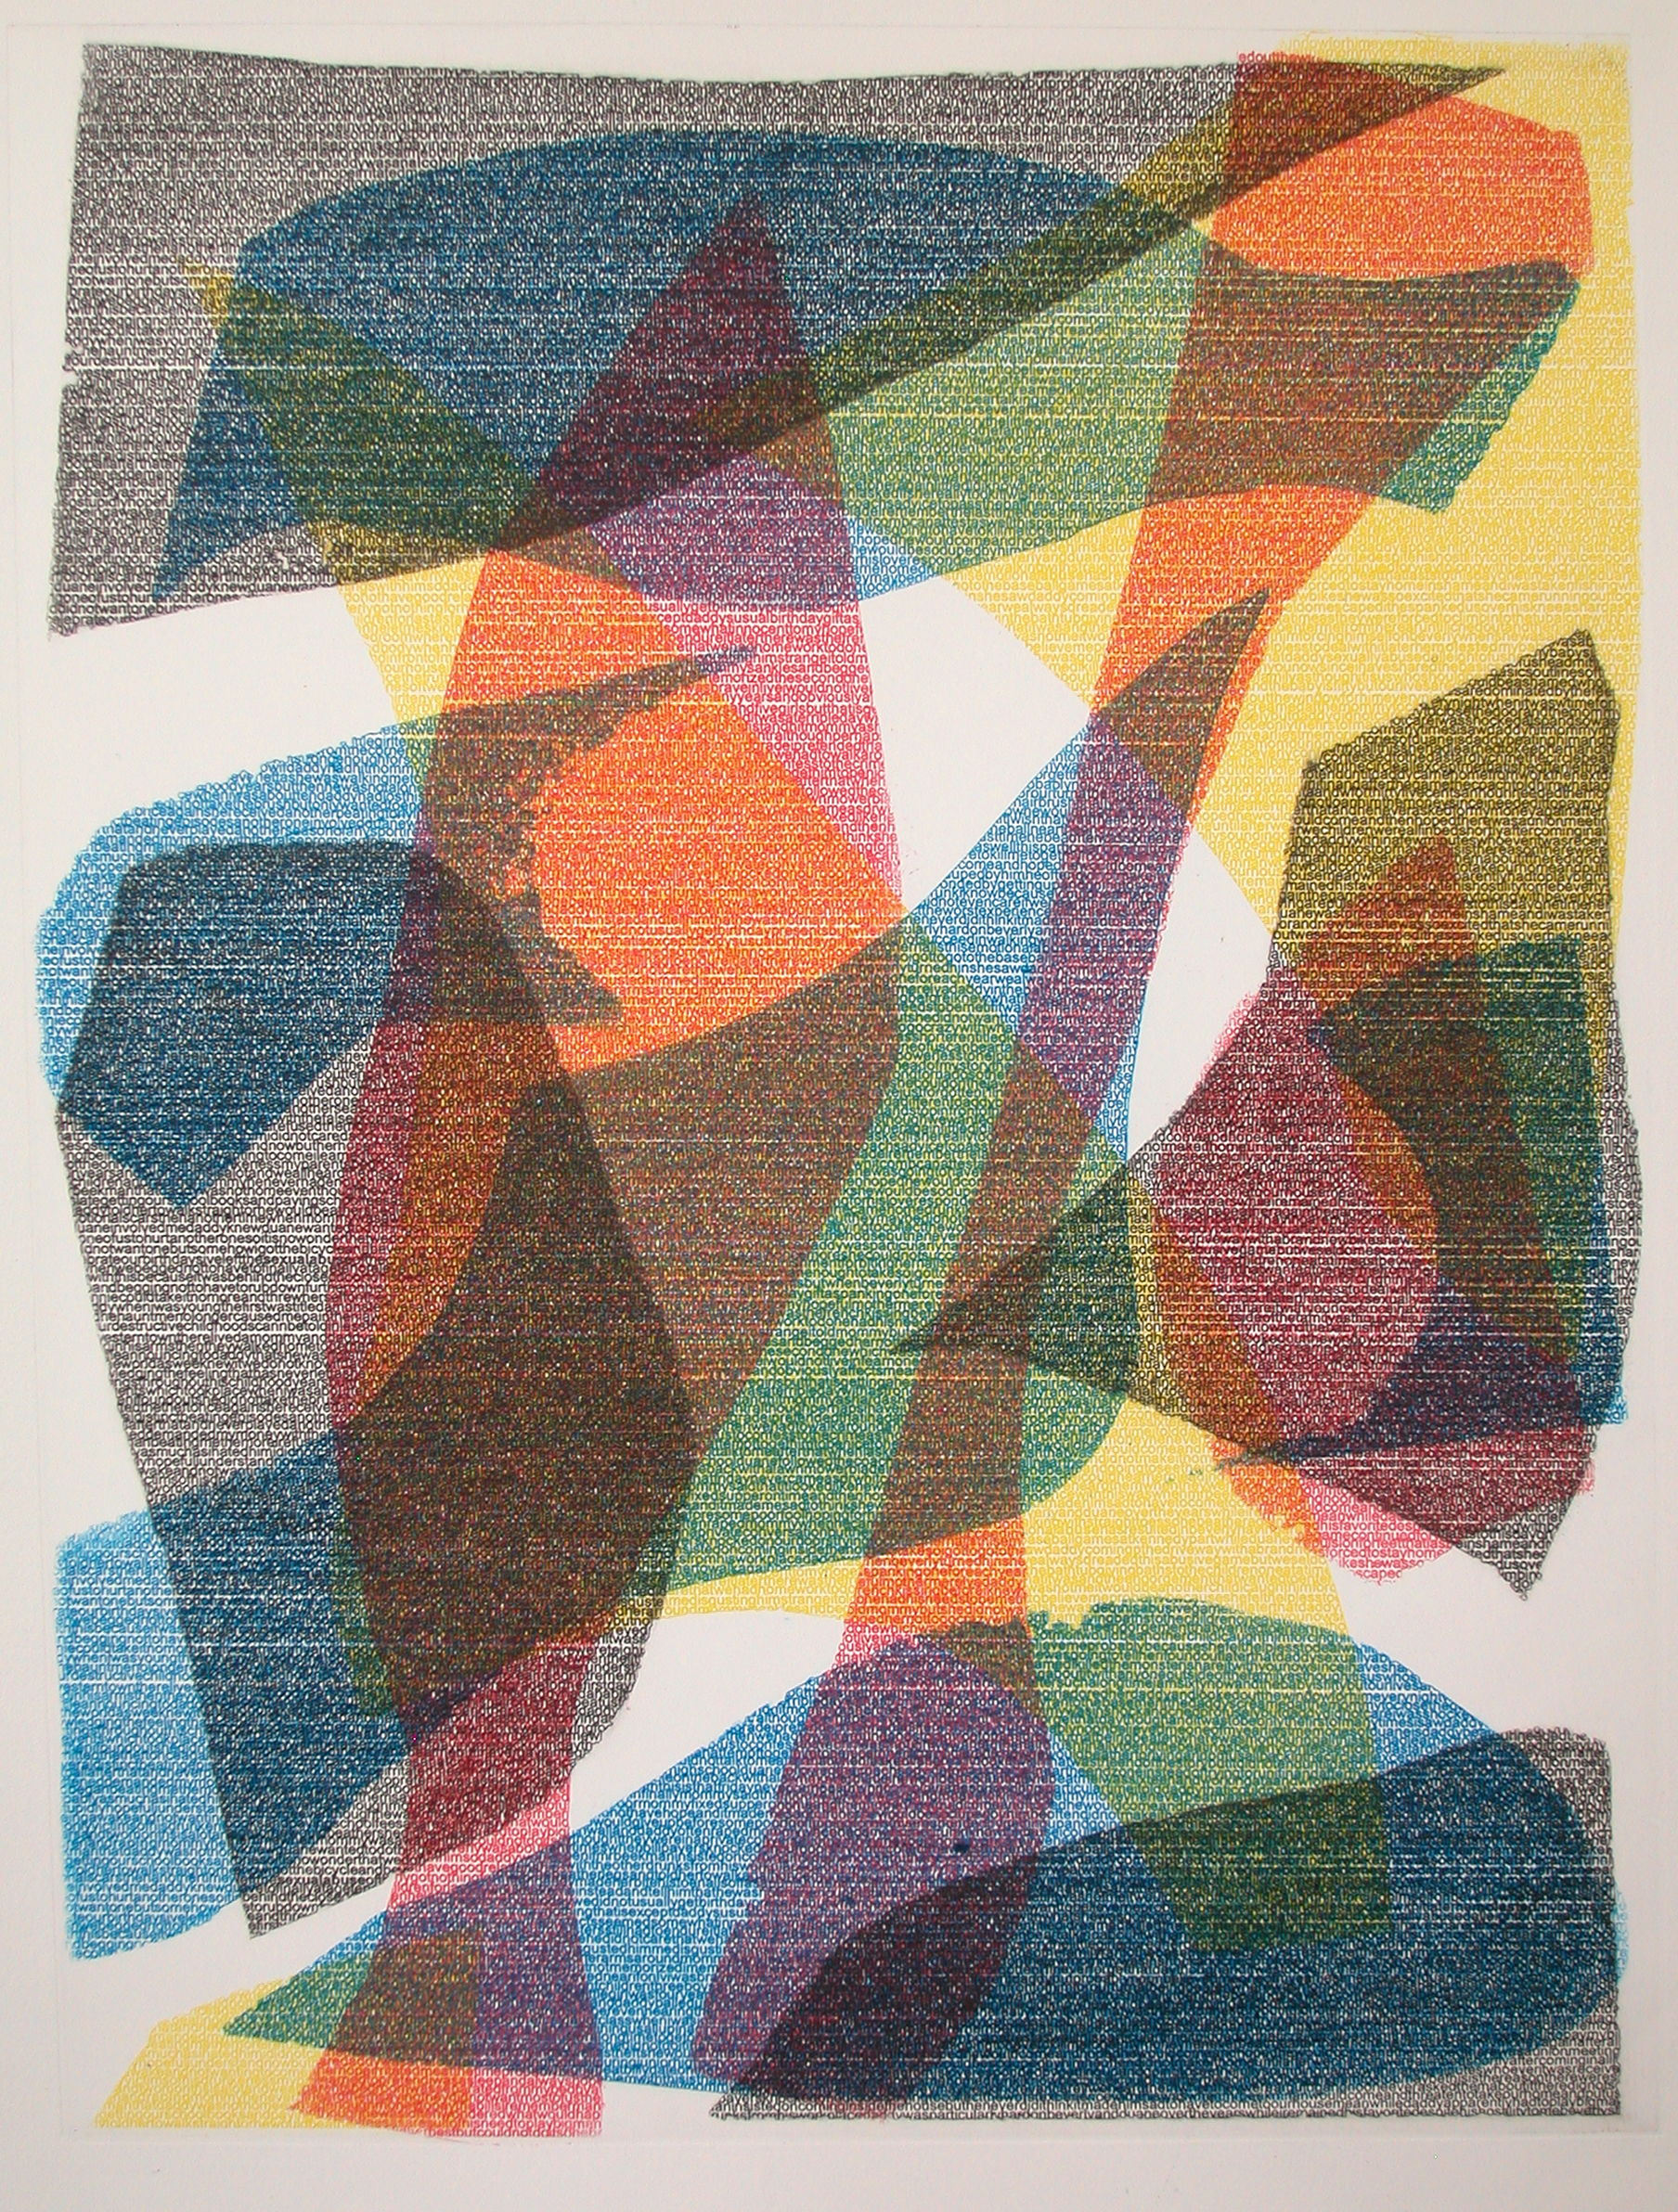
26. Text-Stencil Intaglio-Type
An image stencil can be created entirely of text, intended to be read or to function as texture. Text finer than 1/8th inch does not require an aquatint screen exposure prior to the image exposure. Leading appears between rows of text in Microsoft Word, but Photoshop has more flexibility.
Storyboard: Fragments of My ChildhoodI, 2007 — 4-plate pieced photopolymer intaglio-type with text stencils, image size 18” x 24”, framed size 28” x 34”
Materials and equipment
Text Stencil Intaglio-Type requires: text-writing program, such as Microsoft Word or Photoshop; transparency; inkjet printer; two laminated ImagOn plates (one for a step-test); standard developing, inking and printing supplies.

Steps for creating a text stencil without leading
- Open Photoshop (or other photo-manipulation software). Make a new file the size and resolution desired with a White background. – Save as a tiff file.
- Select the Text Tool in the Toolbox. Choose a color and font for the text. The font for the text in the examples here was Black Arial Font 12, which does not require an aquatint screen exposure because it is finer than 1/8th inch.
- Type a line of text. Leave the Text Tool; flatten the image.
- Return to the Text Tool. Write a line of text. Select the Move Tool.
- Move the text close to the previous line. Flatten the image: Layers, Flatten Image. Save.
- Continue writing with the Text Tool, moving the text, flattening the image, and saving the file until the image is completed.
- Do not change the levels on the image if using Black font. Print on a transparency with an inkjet printer.
- Make a step-test plate with a laminated ImagOn plate to determine the best image exposure. Text generally requires a slightly longer exposure than an aquatint screen.
- Based on the step-test, make an image exposure of the text.
The photo at the top right is a 24 x 24 inch storyboard stencil with no leading, Black Arial Font 12, without spacing between words or punctuation. It was used to create the 18 x 24 inch 4-color texturized abstraction print shown in the middle photo, Storyboard 1A: Childhood. The bottom photo shows an 18 x 24 inch storyboard stencil with no leading, spacing or punctuation in Black Arial Font 12. Its horizontal format saves space for printing the transparency.
Intaglio Type
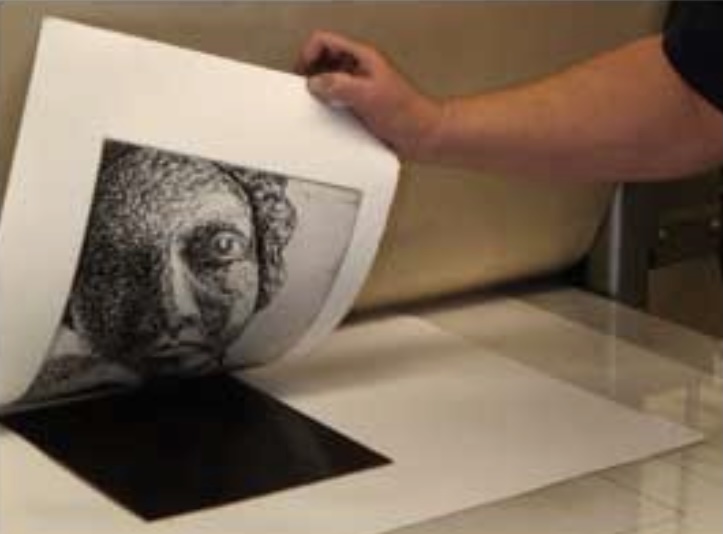
27. Photo Intaglio-Type
Photo Intaglio-Type is a non-etch technique for producing photographic quality continuous-tone imagery with an aquatint screen exposure followed by an image exposure with a photo transparency stencil.
Materials and equipment
Photo Intaglio-Type requires: two laminated ImagOn plates (one for step test and the other for the print); aquatint screen; black-and-white continuous-tone photograph (or a CMYK photograph converted to black-and-white); Photoshop or other image-manipulation software; inkjet or photocopy transparency; Rubylith or opaque card for the step-test; standard developing, inking and printing materials.
Steps
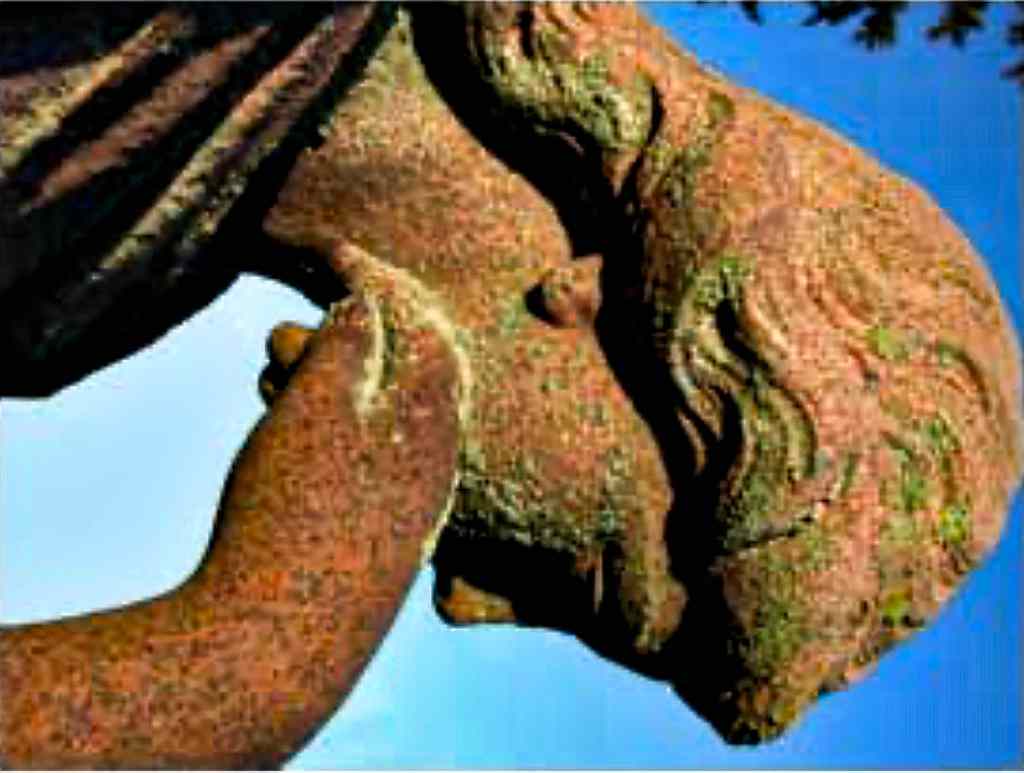
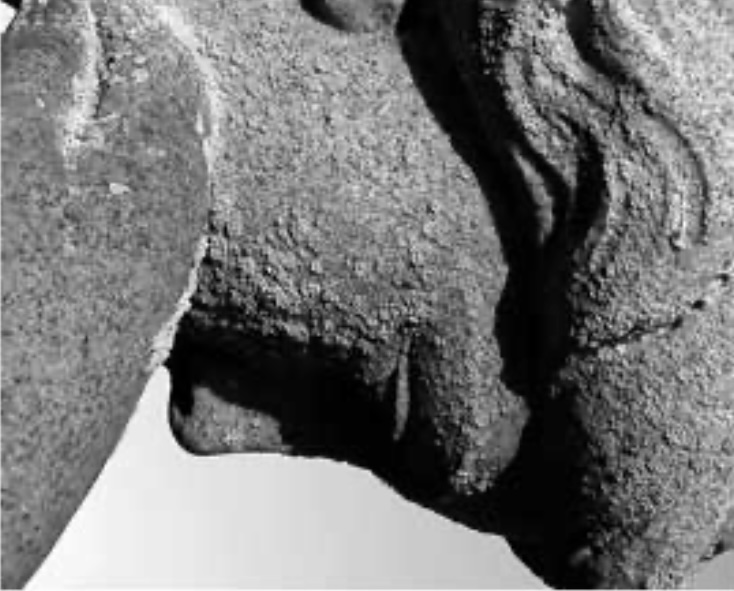
- Begin with a continuous-tone black-and-white or CMYK photograph, such as the digital image in the top photo. If the image is digital, open it with Photoshop (or other photo-manipulation software) and change the Mode to Grayscale.
- Otherwise, scan the image and import it into Photoshop.
- In Photoshop, adjust the image as desired. The image in the bottom photo is derived from the CMYK image in the top photo. The image was cropped and the sliders below the histogram in Levels were moved to include black and white tones.
- Option 1: photocopy the black-and-white photo with opaque black ink on a photocopy transparency; be sure the image is dense enough.
- Option 2: print the manipulated image on an inkjet transparency with an inkjet printer.
- Make a standard aquatint screen exposure on the laminated ImagOn test plate.
- Make a step-test image exposure with the transparency positioned emulsion-to-emulsion on the test plate.
- Develop and print to determine the best image exposure.
- Make a standard aquatint screen exposure on the second laminated ImagOn plate.
- Make the image exposure with the transparency positioned emulsion-to-emulsion on the plate.
- Tray develop in the standard manner. Rinse, spray with vinegar, rinse, dry, heat dry. Expose the plate without a stencil for the same quantity of UV light as the aquatint screen exposure. Set the plate aside overnight.
- Ink and print the plate.
Intaglio Type
28. Digital-Halftone Intaglio-Type
Monotone Photo Intaglio-Type is a non-etch technique for producing photographic quality continuous-tone imagery without the necessity of an aquatint screen exposure. If blacks in the photo stencil are denser than 80% random dot structure, the blacks drop out in the developed ImagOn plate and produce whites in the print. Aquatinting in traditional etching or an aquatint screen exposure in non-etch intaglio-type break up the solid areas, which avoids open biting. Photographs can be manipulated in Photoshop (or other image-manipulation software) to open solid blacks to 80%. Inkjet printers produce a random dot structure. These two qualities permit image exposures without the necessity of an aquatint screen exposure.
The easiest way to determine the necessary Photoshop manipulations for digital halftone photo stencils is to make a dot structure step-test for the transparency and printer. The step-test needs to be performed once to determine the best density of black for each transparency and printer combination.
Dot Structure Density Test
Materials and equipment
The step-test requires: Photoshop (or other image-manipulation software); the transparency that will be used for the photo stencil, such as Azon 787N clear graphic film; the inkjet printer that will be used for the photo stencil – it should be able to print opaque blacks without mixing black with colored inks, such as the Epson 7600 or Epson 3000; loupes OR laminated ImagOn plate and standard developing, inking and printing materials and equipment
Steps for the making the step-test transparency
- In Photoshop, make a new file and name it density test: File, New
- This brings up the menu shown in the figure top right. Name the file and complete the options as shown in the menu. The dimensions shown here assume a transparency size 8½ x 11 inches.
- Make sure the foreground and background colors at the bottom of the Toolbox are the default: black foreground and white background.

- In the Command Menu, click on Select. This brings up a drop-down Menu; click All.
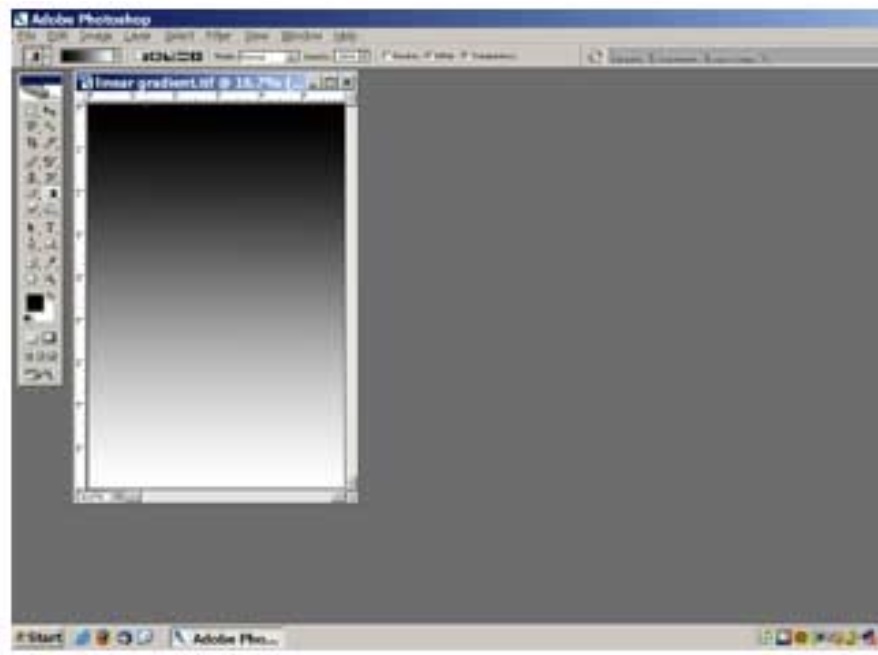
- Select the Gradient Tool in the Toolbox and the Linear Gradient in the Options Bar.
- Draw a straight line from the top to the bottom. This produces the gradient shown in the figure opposite.
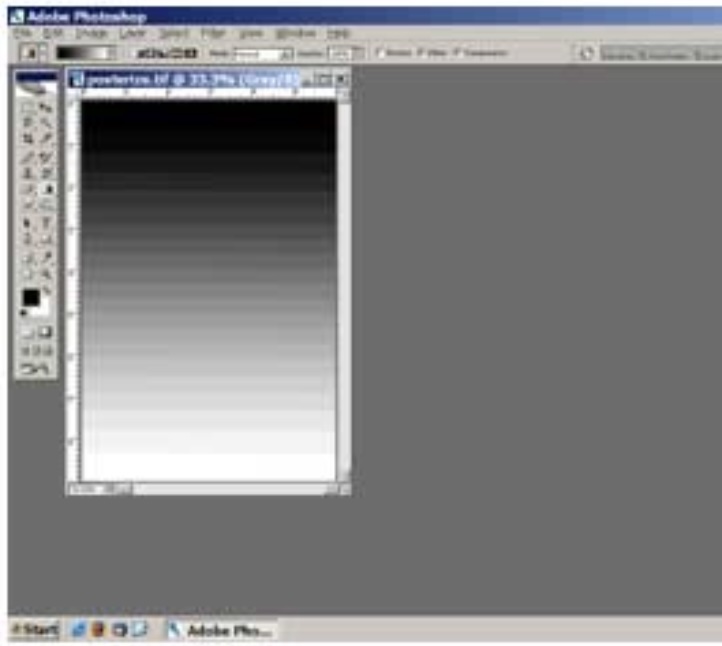
- In the Command Menu, select Image. This brings up a drop-down Menu; select
- Posterize, which brings up a pop-up menu.
- Change the Levels to 21. This produces the distinct gradients shown in the figure opposite.
- In the Command Bar, choose Select. This brings up a drop-down menu; click on Deselect.
- In the Toolbox, select Text.
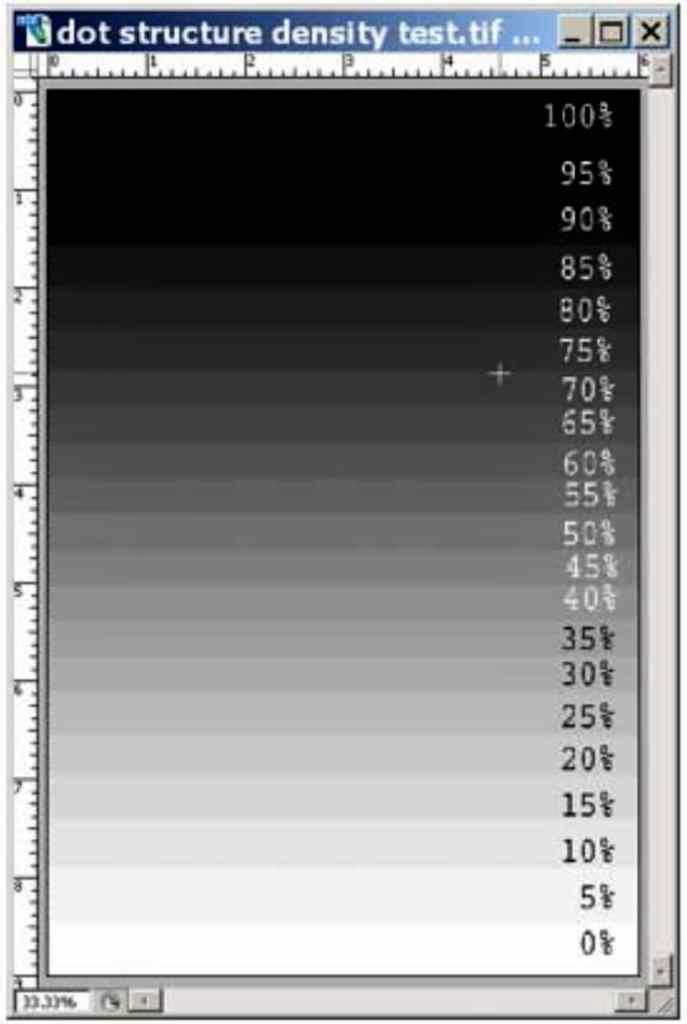
- Label each distinct gradient, from 100% at the top bar to 0% at the bottom bar. The file should now look like the second figure.
- Note that the text is in white for the dark tones and black for the light tones to facilitate easy reading.
- Save the file.
- Print the dot structure density test on the emulsion side of the transparency with the inkjet printer you plan to use for photo stencils.
- Set the printer to best quality, Black. If the printer has the option, print with two cartridges of matte black ink. To print AZON 787N Clear Graphic Film in the Epson PRO 7600 Inkjet Printer: Select the printer and film size; in Print Settings, select Black, Adhesive Vinyl, Advanced (uncheck all boxes), 720 dpi.
Option 1:
- Examine the transparency with loupes to determine where the dot structure is 80% random black dots (bottom photo).
- When manipulating photos in Photoshop, plan to move either the Levels or Curves to change 100% black to the percentage that produces the 80% random black dots;

OR, Option 2:
- Position the transparency on the laminated ImagOn plate emulsion-to-emulsion at the platemaker.
- Expose the transparency with the light units required for the standard aquatint screen exposure.
- Develop and print the plate.
- Examine the print for the blackest black; this could be anywhere from 85% to 55%. The blackest black is the 80% random dot structure.
- In Photoshop, move either the Levels or Curves to change 100% black to the percentage that produces the blackest black for the transparency and printer combination.
Intaglio Type
29. Digital-Halftone Intaglio-Type for Monotone Photo Stencils
An aquatint screen exposure prior to an image exposure with a photo stencil produces a continuous-tone non-etch intaglio-type monotone print. To avoid the necessity of an aquatint exposure, manipulate the photo stencil in Photoshop to create a digital halftone for a non-etch intaglio-type monotone print. Before manipulating the photo, determine the density for the transparency and inkjet printer that opens up 100% blacks to an 80% random dot structure by making the Dot Structure Density Test.
Manipulate the Image in Photoshop
Materials and equipment
Manipulating the image requires: film or digital photograph; Photoshop (or other image-manipulation software); transparency, such as Azon 787N Clear Graphic Film; and an inkjet printer, such as Epson PRO 7600.
note: you may have to substitute with a current Epson printer that has double Matt black mode
Steps
- Open the original photo file and save as a new tiff file in a new folder to preserve the original file. Work only with the duplicate file.
- Change the size to fit the transparency: Image, Image Size, uncheck Resample Image, as in the top right figure. Fill in the inches. Click OK.
- Change the resolution so it is at least 1/4th the printer output, 720 on the Epson PRO 7600 (some say 1/6th or 120): Image, Image Size. Check Resample Image, Bicubic, and Constrain Proportions, as in the second figure, right. Change the resolution in steps, as 111.889 to 150 dpi and then 180 dpi. Save as a new file.

- Crop the image if it improves the image or if needed to fit the transparency: Select with a Marquee Tool; then Image, Crop.
- Straighten any angled lines: Select, All; Edit, Transform, Skew.
- Straighten the image if needed: Image, Rotate, Arbitrary, and then fill in degrees and CW or CCW.
- Change the Mode to black-and-white: Image, Mode, Grayscale. Save as a new tiff file.
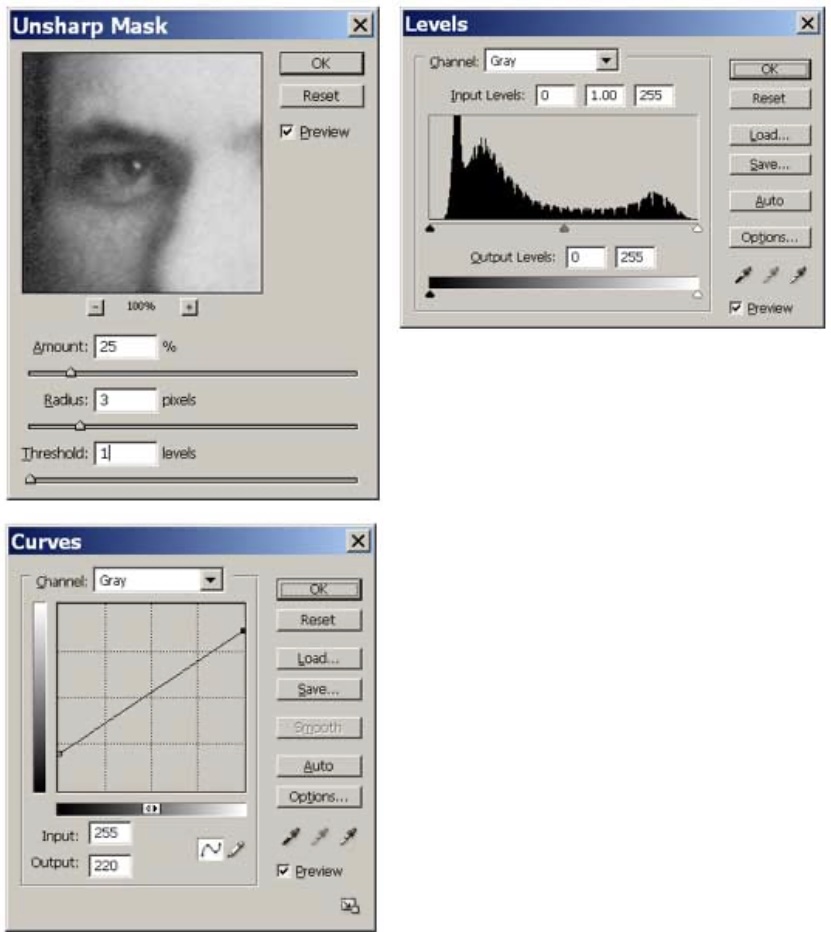
- Improve the contrast: Image, Adjustments, Levels. Move the sliders as needed to get black and white. In the bottom figure, the black slider below the histogram would be moved to the right. Save as a new tiff file.
- Magnify the image with the Zoom Tool in the Toolbox to remove defects with the Clone Tool or Band-aid Tool.
- Save as a new tiff file.
- If the image was scanned, sharpen the image in increments; do not sharpen digital camera images. To sharpen: Filter, Sharpen, Unsharp Mask, check Preview so you can see the effect. Use 25-50%, 1-3 Radius, 0-2 Threshold, as shown in the figure opposite.
- Save as a new tiff file.
- If needed, repeat these steps and save as another new tiff file and add “fixed” to the title.
- Use the Zoom Tool to return the image to a size that fits the screen.
Prepare the Digital-
Halftone Stencil
After performing the dot structure density test for the printer and transparency and determining the percentage with the blackest black, the image will need to be adjusted accordingly.
Steps
The easiest way to lower the density of blacks is in Curves: Image, Adjustments, Curves; then drag the black diagonal to the percentage determined by the dot structure density test. In the second figure, right, the diagonal was moved to 80% since the best black printed at 80% for Azon 787N Clear Graphic Film in an Epson PRO 7600 Printer. In my experience, the light tones drop out also, so the diagonal is also moved to 15% to leave some dots in the whitest whites.
- Save the file with the title “ready”.
- Set the printer to best quality, Black. If the printer has the option, print with two cartridges of matte black ink.
To print AZON 787N Clear Graphic Film in the Epson PRO 7600 Inkjet Printer: Select the printer and film size; in Print Settings, select Black, Adhesive Vinyl, Advanced (uncheck all boxes), 720 dpi.
- Print on the emulsion side of the transparency. Be careful handling the transparency to avoid fingerprints that could block light.
The digital-halftone transparency is now ready to be used in the standard manner for image exposure without an aquatint screen exposure to produce a monotone image.

Only a Prairie Farmer I, 2007 — two-layer photopolymer intaglio-type with a text stencil and a photo stencil worked with spitbite, image size 9” x 12”, framed size 17” x 20”,
Example
The example used throughout this topic began with a scan of a small portrait taken in the early 1900s (top left). The photo was manipulated in Photoshop to enhance it, as described in this topic (bottom left). To enhance the aged effect, the photo was cropped to an oval.
- Finally, the photo was adjusted in Curves to prepare it for printing onto Azon 787N Clear Graphic Film with an Epson PRO 7600 inkjet printer (immediate left).
Note that the contrast is reduced when Curves are changed to 80% and 15%.
Intaglio Type
30. Layered Intaglio-Type
Layers of ImagOn can be laminated to a single plate after exposure. Standard tray development affects only the top layer. Hand development with spit-bite over-develops the top layer, which reveals the lower layer in selected areas. Dark tonal areas of ImagOn are thinner than light tonal areas so dark tonal areas respond more readily to spit-bite treatment to reveal the lower layer.

Materials and equipment
Layered Intaglio-Type requires: laminated ImagOn plate; a piece of ImagOn taped with transparent tape to a second plate of the same size; image stencils and/or aquatint screen; standard materials and equipment for developing, spit-biting, inking and printing.
Steps
- When working with layers, note which edge is the top of the image on each plate at all times so the plates are layered as planned.
- The print was produced by exposing a laminated ImagOn plate with the text stencil in the top photo; Arial Font 12 does not require an aquatint screen exposure since the font is smaller than 1/8 inch.
- For the print, the taped plate was exposed with the photo stencil (right), which was previously manipulated in Photoshop (Curves 80% and 15%) to avoid an aquatint screen exposure;
- the photo was printed on an Azon 787N transparency with an Epson 7600 inkjet printer. The two plates required different amounts of UV light.
- After both plates are exposed, remove the Mylar from the laminated ImagOn plate. Remove the protective backing from the taped ImagOn plate.
- Spray water on the exposed film of both plates. Position the loose film on the laminated plate with the Mylar side facing up.
- Squeegee the top layer of film. Rub with a cloth.
- Run the layered plate through the press to facilitate bonding.
- Tray develop the plate in the standard manner. Rinse; spray vinegar; rinse; dry the plate.
- Apply spit-bite solution to the top layer wherever the lower layer should show through.
- Rub the spit-bite areas with a sponge to facilitate removal of the top layer. Rinse; spray with vinegar; rinse; dry.
- Make a proof print. The bottom photo shows the plate after the first application of spit-bite.
- If not enough of the lower image is visible, apply more spit-bite.
Note: it takes longer for spit-bite to eat through light tonal areas than dark tones.